Installation on Linux
This chapter describes the system requirements, source file structure, and the installation instructions for setting up DX-RT on a Linux-based host system.
If you received a prebuilt libdxrt.so package from DEEPX, install it with the package-provided instructions. No source build is required.
The build/install steps in this chapter are for developers building DX-RT from source.
After you check the system requirements, follow these instructions.
- System Requirement Check
- Build Environment Setup (source build — for developers)
- Source File Structure Check
- Framework Build on Linux
- Linux Device Driver Installation
- Python Package Installation
- Service Registration
- Sanity Check
System Requirements
This section describes the hardware and software requirements for running DX-RT on Linux.
Hardware and Software Requirements
- CPU: amd64(x86_64), aarch64(arm64)
- RAM: 8GB RAM (16GB RAM or higher is recommended)
- Storage: 4GB or higher available disk space
- OS: Ubuntu 26.04 / 24.04 / 22.04 / 20.04 (x64) Debian 12 / Debian 13 (x64)
- Driver: v2.5.0 or later
- PCIe Driver: v2.4.0 or later
- Firmware: v2.7.0 or later
- Hardware: The system must support connection to an M1 M.2 module with the M.2 interface on the host PC.
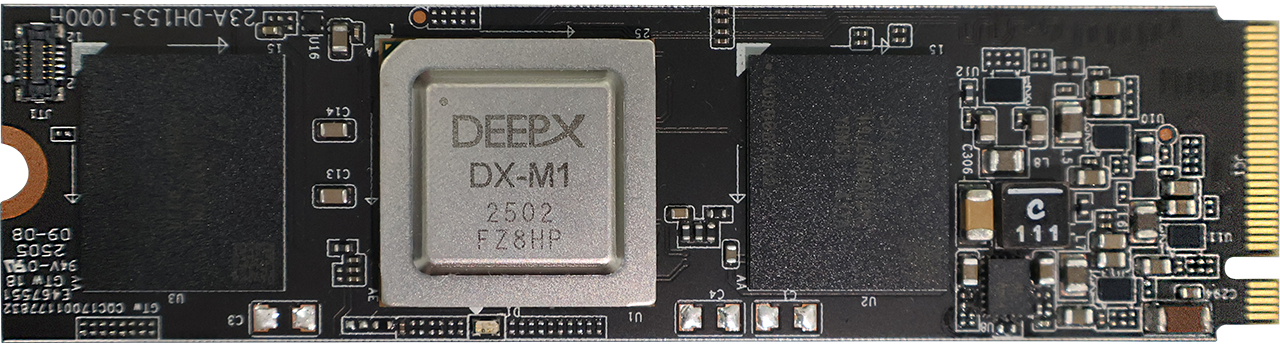
Figure. DX-M1 M.2 Module
Build Environment Setup
DEEPX provides an installation shell script to set up the DX-RT build environment. You can install the entire toolchain installation or perform a partial installation as necessary.
DX-RT supports the Target OS of Ubuntu 26.04, Ubuntu 24.04, Ubuntu 22.04, and Ubuntu 20.04.
Installation of DX-RT
To install the full DX-RT toolchain, use the following commands.
cd dx_rt
./install.sh --all
Here are the available install.sh options.
Usage: ./install.sh [OPTIONS]
Install necessary components and libraries for the project.

Options:
  --help                       Display this help message and exit.
  --arch <ARCH>                Specify the target CPU architecture. Valid options: [x86_64, aarch64].
  --dep                        Install core dependencies such as cmake, gcc, ninja, etc and python3.
  --onnxruntime                (Optional) Install the ONNX Runtime library.
  --all                        Install all dependencies and the ONNX Runtime library.

  --python_version <VERSION>   Specify the Python version to install (e.g., 3.10.4).
                                 * Minimum supported version: 3.8.10.
                                 * If not specified, the OS default Python 3 will be used.
  --venv_path <PATH>          Specify the path for the virtual environment.
                                 * If this option is omitted, no virtual environment will be created.
Installation with ONNX Runtime
Use the ONNX Runtime option if you need to offload certain neural network (NN) operations to the CPU that are not supported by the NPU.
We recommend using ONNX Runtime linux x64 version more than v1.20.1.
https://github.com/microsoft/onnxruntime/releases/download/v1.20.1/onnxruntime-linux-x64-1.20.1.tgz

sudo tar -xvzf onnxruntime-linux-x64-1.20.1.tgz -C /usr/local --strip-components=1
sudo ldconfig
To install the ONNX Runtime library, run the following command.
./install.sh --onnxruntime
Installation for a Specific CPU Architecture
The DX-RT targets the x86_64 architecture. If you’re compiling for another architecture (e.g., aarch64), specify it using the --arch option.
./install.sh --arch aarch64 --onnxruntime
Source File Structure
The DX-RT source directory is organized as follows.
You can install the full toolchain using the install.sh, and the build and library using build.sh.
.
├── assets
├── bin
├── cli
├── build.sh
├── build_x86_64
├── build_aarch64
├── cmake
├── docs
├── examples
├── extern
├── install.sh
├── lib
├── python_package
├── release
├── service
└── tool
assetsReference images.binCompiled binary executables.cliCommand-line application source code.build.shShell script for building the framework.build_x86_64/build_aarch64These directories are where the build artifacts are stored, specifically for the x86_64 and aarch64 architectures, respectively.cmakeCMake scripts for build configuration.docsMarkdown documents.examplesProvides a set of practical inference examples that demonstrate how to use the DX-RT framework.externThird-party libraries.install.shShell script for toolchain installation.libThe core source code for the DX-RT libraries.python_packagePython modules for DX-RT.releaseBuild output directory for release artifacts, including generated prebuilt binary Debian packages (for example,libdxrt-bin_<version>_amd64.debandlibdxrt-bin_<version>_arm64.deb).serviceService unit files for runtime management.toolProfiler result visualization tools.
Framework Build on Linux
After the DX-RT environment setup, you can build the framework using the provided build.sh shell script.
Build Overview
DX-RT supports the following target CPU architectures:
- x86_64 for desktop/server-class hosts
- aarch64 for embedded systems and ARM-based platforms
You can select the target architecture using the --arch option in the build script.
Recommended Build Process (Clean option)
This chapter explains the importance of performing a clean build to maintain a stable and conflict-free build environment.
To do this, you must run a clean operation before starting any new build process.
# First, clean the previous build artifacts
./build.sh --clean

# Then, run the build with your desired options
./build.sh
You can also combine these commands. The && operator ensures that the build command will only run if the clean command succeeds.
./build.sh --clean && ./build.sh
Build Script Options
This chapter explains the available options for the build.sh script, which is used to compile the DX-RT framework.
Usage: ./build.sh [OPTIONS]
Build the dx-rt project with various options.

Options:
  --help            Display this help message and exit.
  --clean           Perform a clean build, removing previous build artifacts.
  --verbose         Show detailed build commands during the process.
  --type <TYPE>     Specify the CMake build type. Valid options: [Release, Debug, RelWithDebInfo].
  --arch <ARCH>     Specify the target CPU architecture. Valid options: [x86_64, aarch64].
  --install <PATH>  Specify the installation path for dx-rt files.
  --uninstall       Remove previously installed dx-rt files.
  --docker          Build the project within a Docker environment.
  --clang             Use Clang as the compiler for the build.

  --python-exec <PATH> Specify the Python executable to use for the build.
                       If omitted, the default system 'python3' will be used.
  --venv_path <PATH>  Specify the path to a virtual environment to activate for the build.
                    If omitted, no virtual environment will be activated.
Examples for Build Script Option
Example 1: Clean Build and Install (Recommended Workflow)
This example shows the safest way to build and install the library.
First, you clean the workspace, then you build for a specific architecture and install the libraries to a system path.
# Step 1: Clean the workspace to ensure no old files interfere
./build.sh --clean

# Step 2: Build for the aarch64 architecture and install to /usr/local
./build.sh --arch aarch64 --install /usr/local
Example 2: Build a Debug Version
To build the framework with debugging symbols, which is useful for development and troubleshooting.
# Clean is recommended here as well, especially if your last build was a Release version
./build.sh --clean

# Build with the 'Debug' type
./build.sh --type Debug
Example 3: Uninstall the Library
To remove all library files installed by a previous --install command.
./build.sh --uninstall
Debian Package Installation
DX-RT is distributed as a prebuilt binary Debian package (libdxrt-bin), provided per CPU architecture:
| File name example | Target architecture |
|---|---|
libdxrt-bin_3.4.0_amd64.deb | amd64 (x86_64) |
libdxrt-bin_3.4.0_arm64.deb | aarch64 (arm64) |
The package contains precompiled shared libraries, headers, CLI tools, and the dx_engine Python wheel — no on-target compilation is required. The dx_engine module is automatically installed to the system Python during package installation, enabling immediate Python API access to DX-RT functionality.
The prebuilt binaries are compiled against glibc ≥ 2.27 and libstdc++ from GCC 10+, so the package supports the following distributions and newer:
| Distribution | Minimum supported version |
|---|---|
| Ubuntu | 20.04 LTS (glibc 2.31) |
| Debian | 11 (bullseye) (glibc 2.31) |
Ubuntu 18.04 and older releases are not supported — they ship glibc 2.27 with an older libstdc++ ABI and lack the libgcc-s1 package (renamed from libgcc1 starting Ubuntu 20.04). Attempting to install on these systems will fail with unmet dependency errors. Use the source-based build (./build.sh) if you must target older distributions.
The source-based Debian package (libdxrt_<version>_all.deb) is no longer distributed. If you need to build from source, use ./build.sh as described in the Framework Build on Linux section above.
Package Contents
The libdxrt-bin Debian package includes the following components:
- Native Libraries: Precompiled
libdxrt.soand related shared libraries - CLI Tools:
dxcli,dxrun,dxparse,dxtop,dxrtd - Headers: C/C++ header files for DX-RT API development
- dx_engine Python Wheel: Pre-built Python module for Python API access (automatically installed to system Python)
Installing the Prebuilt Binary Package (libdxrt-bin)
Use the file that matches your target CPU architecture (check with dpkg --print-architecture).
For amd64 (x86_64) hosts:
sudo dpkg -i libdxrt-bin_3.4.0_amd64.deb
For aarch64 (arm64) hosts:
sudo dpkg -i libdxrt-bin_3.4.0_arm64.deb
If dpkg reports unmet dependencies, resolve them with:
sudo apt --fix-broken install
Replace 3.4.0 in the file name with the version you actually received.
When installing via the Debian package, the dx_engine Python wheel is automatically installed to the system Python, providing immediate Python API access. For virtual environments, please refer to the section "Using a Virtual Environment" below.
Post-Installation Verification
Verify that both the native libraries and the dx_engine Python module are correctly installed:
# Verify dx_engine Python module (included in the package)
python3 -c "import dx_engine; print(dx_engine.__version__)"

# Verify shared libraries are registered
ldconfig -p | grep libdxrt
If shared library errors occur, run:
sudo ldconfig
Using a Virtual Environment
While the Debian package installs the Python module to the system Python, you can make it visible inside a virtual environment as follows:
# Install python3-venv if not already installed
sudo apt install python3-venv

# Create a virtual environment with access to system site-packages
python3 -m venv --system-site-packages my_venv

# Activate the virtual environment
source my_venv/bin/activate
Uninstalling the package
sudo dpkg --purge libdxrt-bin
Build Target Options
This chapter explains how to configure optional build targets in DX-RT, such as enabling Python API support or shared library builds.
These options can be set by editing the following configuration file:
cmake/dxrt.cfg.cmake
Here are the available options for building targets.
option(USE_ORT "Use ONNX Runtime" ON)
option(USE_PYTHON "Use Python" ON)
option(USE_SERVICE "Use DXRT Service" ON)
USE_ORT: Enables ONNX Runtime for NN (neural network) operations that NPU does not supportUSE_PYTHON: Enables Python API supportUSE_SERVICE: Enables service for multi-process support
After modifying dxrt.cfg.cmake, re-run the build with ./build.sh --clean to apply changes.
Build Guide for Cross-compile
This section explains how to build the DX-RT framework for different CPU architectures, including native and cross-compile environments.
Cross-compilation is typically used to build DX-RT on an x86_64 host system for deployment on an ARM-based (aarch64) target.
Setup Files for Cross-compile
DX-RT supports the following CPU architectures:
- x86_64 — Native build on host system
- aarch64 — Cross-compile for ARM-based targets
The default architecture is x86_64.
Toolchain Configuration
To cross-compile, configure a CMake toolchain file located at:
cmake/toolchain.<CMAKE_SYSTEM_PROCESSOR>.cmake
Example: Toolchain for aarch64
SET(CMAKE_C_COMPILER /usr/bin/aarch64-linux-gnu-gcc )
SET(CMAKE_CXX_COMPILER /usr/bin/aarch64-linux-gnu-g++ )
SET(CMAKE_LINKER /usr/bin/aarch64-linux-gnu-ld )
SET(CMAKE_NM /usr/bin/aarch64-linux-gnu-nm )
SET(CMAKE_OBJCOPY /usr/bin/aarch64-linux-gnu-objcopy )
SET(CMAKE_OBJDUMP /usr/bin/aarch64-linux-gnu-objdump )
SET(CMAKE_RANLIB /usr/bin/aarch64-linux-gnu-ranlib )
Customize the paths based on your toolchain installation.
Non Cross-compile Case (Build on Host)
To build and install DX-RT on the host system, run the following command.
./build.sh --install /usr/local
Recommended install path: /usr/local (commonly included in system library search paths)
Cross-compile Case (Build for Target Architecture)
Cross-compile for a specific architecture, run the following command.
./build.sh --arch <target_cpu>
Here are the examples of cross-compile cases.
./build.sh --arch aarch64
./build.sh --arch x86_64
Output Directory
After a successful build, output binaries are in the following directory.
<build directory> /bin/
Typical contents:
<build directory>/bin/
 ├── dxrtd
 ├── dxcli
 ├── dxparse
 ├── dxrun
 └── examples
Legacy names dxrt-cli, parse_model, and run_model are preserved as backward-compatible aliases and continue to work.
Python for cross-compile is not supported in the current version, but will be supported in the next release.
Linux Device Driver Installation
After building the DX-RT framework, you can install the Linux device driver for M1 AI Accelerator (NPU).
To install the Linux device driver, you can choose either Section. DKMS and Debian Package or Section. Driver Source.
DKMS and Debian Package
Before you begin, ensure you have sudo privileges and an active internet connection.
Installing DKMS Debian Package
Here's how to install a DKMS (Dynamic Kernel Module Support) Debian package, along with explanations of messages you might see during the process.
Pre-installation Step (Recommended)
Before installing any Debian package, it's highly recommended to update your package lists. This ensures that your system has the most current information about available packages and their dependencies from the configured repositories. This step is particularly important when using apt for dependency resolution.
Update Package Lists:
sudo apt update
This command refreshes your system's package cache.
Installation Steps
There are two primary ways to install a local DKMS Debian package:
Using sudo dpkg -i (For direct package installation)
sudo dpkg -i [package_name.deb]
This command directly installs the .deb file. While it's quicker for simple installations, it does not automatically resolve dependencies. If your package has unmet dependencies, dpkg will warn you, and you might need to run sudo apt --fix-broken install afterward to resolve them.
Just replace [package_name.deb] with the actual name of your Debian package file.
Using sudo apt install (Recommended for dependency handling)
sudo apt install ./[package_name.deb]
This method is generally preferred because apt automatically handles any package dependencies for you.
Understanding Installation Messages
You might see various messages during installation, especially when using sudo apt install. Here's what they mean:
initramfs Messages
I: The initramfs will attempt to resume from /dev/dm-1
I: (/dev/mapper/vgubuntu-swap_1)
I: Set the RESUME variable to override this.
These are simply informational messages about your system's boot process, specifically regarding how initramfs handles resuming from a swap partition. They are not errors related to your DKMS package installation and you can safely ignore them. They indicate that your system is configured to resume from a swap partition during boot, which is a normal setup.
"Permission denied" Message (when using apt)
N: Download is performed unsandboxed as root as file '/.../release/dkms_package/dxrt-driver-dkms_[version]_all.deb' couldn't be accessed by user '_apt'. - pkgAcquire::Run (13: Permission denied)
This message can be a bit confusing, but it generally means your package installed successfully. It appears because:
- You're installing a local
.debfile directly usingsudo apt install ./.... - Normally,
aptdownloads packages from remote repositories using a lower-privileged user (like_apt) for security. - However, since you're using
sudoto install a local file, you're already operating with root privileges. The message simply tells you that the_aptuser, which has lower permissions, couldn't access the local file.
In short, the installation went through fine because you used sudo. This message is just apt letting you know about a security check it couldn't perform on a local file, but it doesn't affect the successful installation.
Checking DKMS Driver Status
You can check the status of your DKMS drivers (which driver versions have been added, built, or installed for specific kernel versions) using the dkms status command:
dkms status
For instance:
dxrt-driver-dkms/1.7.1-1, 6.5.0-27-generic, x86_64: installed
In summary, these lines mean:
- The
dxrt-driver-dkmsmodule, version1.7.1-1, is currently installed and fully operational for your system running the6.5.0-27-generickernel on anx86_64architecture. - The same
dxrt-driver-dkmsmodule, version1.7.1-1, is also installed and fully operational for your system running the6.8.0-60-generickernel on anx86_64architecture.
Viewing Package information
To quickly view detailed information about a Debian/Ubuntu package, including those that provide DKMS drivers, you can use the apt show command.
Command:
apt show [package-name]
Replace [package-name] with the actual name of the package you want to inspect (e.g., dxrt-driver-dkms).
Example Usage and Output Interpretation:
If you run apt show dxrt-driver-dkms, you'd see output similar to this:
Package: dxrt-driver-dkms
Version: 1.7.1-1
Status: install ok installed
Priority: optional
Section: kernel
Maintainer: ...
Installed-Size: 698 kB
Depends: dkms
Homepage: https://deepx.ai
Download-Size: unknown
APT-Manual-Installed: yes
APT-Sources: /var/lib/dpkg/status
Description: A DEEPX NPU Driver
This tells you that dxrt-driver-dkms is version 1.7.1-1, is a DKMS module, requires the dkms package, comes from a specific APT source, and its purpose is to provide the DX-RT driver source for automatic rebuilding with new kernels.
Finding Locally Installed Source Code
The source code for DKMS drivers installed via packages is reliably located under the /usr/src/ directory. This is the designated place where DKMS expects to find the source files needed for compilation.
Path:
/usr/src/[module-name]-[module-version]/
Example:
For the dxrt-driver-dkms package (version 1.7.1-1), the source code would likely be in /usr/src/dxrt-driver-1.7.1-1/. You can then cd into this directory to explore the source files.
Driver Source
Prerequisites
Before installing the Linux device driver, you should check that the accelerator device is properly recognized by the system.
To check PCIe device recognition, run the following command.
lspci -vn | grep 1ff4

0b:00.0 1200: 1ff4:0000
If there is no output, the PCIe link is not properly connected. Please check the physical connection and system BIOS settings.
Optional. Display the DEEPX name in lspci.
If you want to display the DEEPX name in lspci, you can modify the PCI DB. (Only for Ubuntu)
To display the DeepX device name, run the following command.
sudo update-pciids
lspci
...
0b:00.0 Processing accelerators: DEEPX Co., Ltd. DX_M1
Linux Device Driver Structure
The DX-RT Linux device driver source is structured to support flexible builds across devices, architectures, and modules. The directory layout is as follows.
- .gitmodules

- [modules]
    |
    - device.mk
    - kbuild
    - Makefile
    - build.sh
    - [rt]
        - Kbuild
    - [pci_deepx] : submodule
        - Kbuild

- [utils] : submodule
device.mk: Device configuration filekbuild: Top-level build rulesMakefile: Build entry pointbuild.sh: Build automation scriptrt: Runtime driver source (dxrt_driver.ko)pci_deepx: PCIe DMA driver (submodule, dx_dma.ko)utils: Supporting utilities (submodule)
Here are the descriptions of the key components.
device.mk
Defines supported device configuration.
To build for a specific device, run the following command.
make DEVICE=[device]
For example, in the case of a device like M1, you should select a submodule, such as PCIe, that has a dependency on M1.
make DEVICE=m1 PCIE=[deepx]
kbuild
Linux kernel build configuration file for each module directory. It instructs the kernel build system on how to compile driver modules.
build.sh
Shell script to streamline the build process. It runs the Makefile with common options.
Here are the options for build.sh.
Usage:
   build.sh <options>

options:
   -d, --device   [device]      select target device: m1
   -m, --module   [module]      select PCIe module: deepx
   -k, --kernel   [kernel dir]  'KERNEL_DIR=[kernel dir]', The directory where the
                                kernel source is located
                                default: /lib/modules/6.5.0-18-generic/build)
   -a, --arch     [arch]        set 'ARCH=[arch]' Target CPU architecture for
                                cross-compilation, default: x86_64
   -t, --compiler [cross tool]  'CROSS_COMPILE=[cross tool]' cross compiler binary,
                                e.g aarch64-linux-gnu-
   -i, --install  [install dir] 'INSTALL_MOD_PATH=[install dir]', module install
                                directory install to:
                                [install dir]/lib/modules/[KERNELRELEASE]/extra/
   -c, --command  [command]     clean | install | uninstall
                                - uninstall: Remove the module files installed
                                on the host PC.
   -j, --jobs     [jobs]        set build jobs
   -f, --debug    [debug]       set debug feature [debugfs | log | all]
   -v, --verbose                build verbose (V=1)
   -h, --help                   show this help
The build process generates the following kernel modules.
-
modules/rt->dxrt_driver.ko
: a core runtime driver for M1 NPU devices. This is responsible for system-level communication, memory control, and device command execution. -
modules/pci_deepx->dx_dma.ko
: PCIe DMA (Direct Memory Access) kernel module for high-speed data transfer between host and the M1 device. This enables efficient data movement with minimal CPU overhead, ideal for real-time and data intensive AI workloads.
Linux Device Driver Build
After completing the environment setup of the DXNN Linux Device Driver, you can build the kernel modules using either the make(Makefile) or build.sh script. Both methods are supported by DEEPX.
If the DKMS Debian package is already installed, it needs to be removed in order to build and install the driver from the source.
Option 1. Build Using Makefile
build
e.g $ cd modules
e.g $ make DEVICE=m1 PCIE=deepx
clean
e.g $ cd modules
e.g $ make DEVICE=m1 PCIE=deepx clean
install
Installs the driver to: /lib/modules/$(KERNELRELEASE)/extra/
e.g $ cd modules
e.g $ make DEVICE=m1 PCIE=deepx install
Option 2. Build Using build.sh
Use this method if your system supports self-compiling kernel modules (.ko files).
build
e.g $ ./build.sh -d m1 -m deepx
(Default device: m1, PCIe module: deepx)
clean
e.g $ ./build.sh -c clean
install
Installs the driver to: /lib/modules/$(KERNELRELEASE)/extra/
e.g $ sudo ./build.sh -c install
Auto-Loading Modules at Boot Time
DEEPX allows kernel modules to be automatically loaded at system boot, either through manual setup or using the build.sh script.
Manual Installation Method
Step 1. Install Kernel Modules
Installs modules to: /lib/modules/$(KERNELRELEASE)/extra/
make DEVICE=m1 PCIE=deepx install
Step 2. Update Module Dependencies
Updates: /lib/modules/$(KERNELRELEASE)/modules.dep
sudo depmod -A
Step 3. Add Module Configuration
Copy the preconfigured module config file.
sudo cp modules/dx_dma.conf /etc/modprobe.d/
This ensures the modules (dxrt_driver, dx_dma) are auto-loaded on boot.
Step 4. Test with modprobe
To verify the correct installation.
sudo modprobe dx_dma
lsmod

  dxrt_driver            40960  0
  dx_dma                176128  1 dxrt_driver
Automated Installation Using build.sh
The build.sh script automates installation and setup, including dependency updates and modprobe configuration.
Run the following command
sudo ./build.sh -d m1 -m deepx -c install

- DEVICE        : m1
- PCIE          : deepx
- MODULE CONF   : /.../rt_npu_linux_driver/modules/dx_dma.conf
- ARCH (HOST)   : x86_64
- KERNEL        : /lib/modules/5.15.0-102-generic/build
- INSTALL       : /lib/modules/5.15.0-102-generic/extra/


*** Build : install ***
make DEVICE=m1 PCIE=deepx install

make -C /lib/modules/5.15.0-102-generic/build M=/home/jhk/deepx/dxrt/module/rt_npu_linux_driver/modules  modules_install

 ....
 - SUCCESS


*** Update : /lib/modules/5.15.0-102-generic/modules.dep ***
depmod -A
cp /home/jhk/deepx/dxrt/module/rt_npu_linux_driver/modules/dx_dma.conf /etc/modprobe.d/
Uninstalling Modules
To completely remove the installed modules and configs.
./build.sh -d m1 -m deepx -c uninstall

- DEVICE        : m1
- PCIE          : deepx
- MODULE CONF   : /.../rt_npu_linux_driver/modules/dx_dma.conf
- ARCH (HOST)   : x86_64
- KERNEL        : /lib/modules/5.15.0-102-generic/build
- INSTALL       : /lib/modules/5.15.0-102-generic/extra/


*** Remove : /lib/modules/5.15.0-102-generic/extra ***
rm -rf /lib/modules/5.15.0-102-generic/extra/pci_deepx
rm -rf /lib/modules/5.15.0-102-generic/extra/rt


*** Remove : /etc/modprobe.d ***
rm /etc/modprobe.d/dx_dma.conf


*** Update : /lib/modules/5.15.0-102-generic/modules.dep ***
depmod
Python Package Installation
This chapter explains how to install the DX-RT Python package, provided under the module name dx_engine. The package supports Python 3.8.10 or later and enables Python-based applications to interface with the DX-RT runtime.
Installation Steps
Step 1. Navigate to the python_package directory.
cd python_package
Step 2. Install the package
pip install .
Step 3. Verify the installation
pip list | grep dx

dx-engine          1.1.4
Alternatively, you can check the version programmatically:
Using Python Interactive Shell:
import dx_engine
print(dx_engine.__version__)
# Output: 1.1.4
Using Command Line:
python3 -c "import dx_engine; print(dx_engine.__version__)"
# Output: 1.1.4
Verify Available Modules and Classes:
import dx_engine
print(dir(dx_engine))
# Output: ['Configuration', 'DeviceStatus', 'InferenceEngine', 'InferenceOption',
#          'RuntimeEventDispatcher', '__version__', ...]
These methods are useful for:
- Automated build scripts and CI/CD pipelines
- Version compatibility checks before running applications
- Debugging installation issues
For details on using DX-RT with Python, refer to Section. Python Tutorials.
Python C++ Module Version Mismatch: If you encounter errors related to Python C++ module version mismatch, it typically means the compiled Python extension was built with a different Python version than the one currently being used. Common error messages include:
malloc(): corrupted top size
or
free(): invalid pointer
or
double free or corruption (out)
Solutions
- Rebuild with correct Python version: Ensure you're using the same Python version for both building and running:
python3 --version # Check current Python versionpip --version # Check current pip versioncd python_packagepip install .
- Use virtual environment: Create a virtual environment with the correct Python version:
python3.10 -m venv dxrt_envsource dxrt_env/bin/activatecd python_packagepip install .
Service Registration
This chapter explains how to register and run the DX-RT background service (dxrtd) to enable multi-process inference. DX-RT uses a systemd-managed daemon to support concurrent access to the NPU by multiple applications.
- DX-RT must be built with
USE_SERVICE=ON. (default setting) - DX-RT must be registered and managed as a system service using
systemd.
Registering and Running the DX-RT Service
Step 1. Modify the service unit file.
Ensure the ExecStart path is correctly configured.
vi ./service/dxrt.service
Step 2. Copy the service file to the system folder.
sudo cp ./service/dxrt.service /etc/systemd/system
Step 3. Start the service.
sudo systemctl start dxrt.service
Service Management Commands
sudo systemctl stop dxrt.service	 	    # Stop the service
sudo systemctl status dxrt.service		# Check service status
sudo systemctl restart dxrt.service		# Restart the service
sudo systemctl enable dxrt.service		# Enable on boot
sudo systemctl disable dxrt.service		# Disable on boot
sudo journalctl -u dxrt.service 		    # View service logs
Sanity Check
This chapter explains how to use the Sanity Check script to verify that the DX-RT driver is correctly installed and that the NPU device is recognized by the system.
Script Usage
The general syntax for running the Sanity Check script is:
sudo ./SanityCheck.sh [option]
If no option is provided, the script defaults to all mode.
Available Options
The following options are available:
all(Default): Performs a comprehensive check of all components, including both the runtime and the driver. If no option is specified, this is the action performed.dx_rt: Runs a check specifically on the DEEPX Runtime (dx_rt) components.dx_driver: Runs a check specifically on the DEEPX driver (dx_driver).help: Displays a help message outlining the available commands and their functions.
Usage Examples
Step 1. Run a full system check (Recommended)
This performs a comprehensive check of both the runtime and the driver.
Use this after installation or when verifying overall system status.
sudo ./SanityCheck.sh
or
sudo ./SanityCheck.sh all
============================================================================
==== Sanity Check Date : ... ====
Log file location : /.../sanity_check_result_..._....log

==== PCI Link-up Check ====
[OK] Vendor ID 1ff4 is present in the PCI devices.(num=1)
==== Device File Check ====
[OK] /dev/dxrt0 exists.
[OK] /dev/dxrt0 is a character device.
[OK] /dev/dxrt0 has correct permissions (0666).
==== Kernel Module Check ====
[OK] dxrt_driver module is loaded.
[OK] dx_dma module is loaded.
[OK] PCIe 02:00.0 driver probe is success.
==== Legacy Driver Installed Check ====
[INFO] /lib/modules/6.8.0-87-generic/kernel/drivers/dxrt_driver.ko ... NONE
[INFO] /lib/modules/6.8.0-87-generic/kernel/drivers/dx_dma.ko ... NONE
==== DKMS Driver Installed Check ====
[INFO] dxrt-driver-dkms/1.8.0-2, 6.8.0-87-generic, x86_64: installed
[INFO] /lib/modules/6.8.0-87-generic/updates/dkms/dxrt_driver.ko ... OK
[INFO] /lib/modules/6.8.0-87-generic/updates/dkms/dx_dma.ko ... OK
==== Runtime Version Dependency Check ====
[OK] Version Dependency Check
   Runtime Framework Version: 3.4.0
   Device Driver Version: v2.5.0
   PCIe Driver Version: v2.4.0
   Firmware Version: device-id=0 v2.7.0
   ONNX Runtime Version: v1.20.1
==== Runtime Executable File Check ====
[OK] Executable File Check
   Runtime Framework Version: 3.4.0
   Device Driver Version: v2.5.0
   PCIe Driver Version: v2.4.0
   Firmware Version: device-id=0 v2.7.0
   ONNX Runtime Version: v1.20.1
   dxcli ...OK
   dxrun ...OK
   dxparse ...OK
   dxtop ...OK
   dxrtd ...OK
   Header: /usr/local/include/dxrt ...OK
==== Runtime dxrtd Service Check ====
[OK] The dxrtd service is running correctly. This is the expected behavior for builds with USE_SERVICE=ON on cmake/dxrt.cfg.cmake

============================================================================
** Sanity check PASSED!
============================================================================
Step 2. Check only DX-RT
Use this option to validate that the runtime components (dx_rt) are properly installed and functional.
sudo ./SanityCheck.sh dx_rt
============================================================================
==== Sanity Check Date : ... ====
Log file location : /.../sanity_check_result_..._....log

==== Runtime Version Dependency Check ====
[OK] Version Dependency Check
   Runtime Framework Version: 3.4.0
   Device Driver Version: v2.5.0
   PCIe Driver Version: v2.4.0
   Firmware Version: device-id=0 v2.7.0
   ONNX Runtime Version: v1.20.1
==== Runtime Executable File Check ====
[OK] Executable File Check
   Runtime Framework Version: 3.4.0
   Device Driver Version: v2.5.0
   PCIe Driver Version: v2.4.0
   Firmware Version: device-id=0 v2.7.0
   ONNX Runtime Version: v1.20.1
   dxcli ...OK
   dxrun ...OK
   dxparse ...OK
   dxtop ...OK
   dxrtd ...OK
   Header: /usr/local/include/dxrt ...OK
==== Runtime dxrtd Service Check ====
[OK] The dxrtd service is running correctly. This is the expected behavior for builds with USE_SERVICE=ON on cmake/dxrt.cfg.cmake

============================================================================
** Sanity check PASSED!
============================================================================
Step 3. Check only the DX-RT Driver
Use this option to test the driver (dx_driver) independently, especially after driver installation or kernel updates.
sudo ./SanityCheck.sh dx_driver
============================================================================
==== Sanity Check Date : ... ====
Log file location : /.../sanity_check_result_..._....log

==== PCI Link-up Check ====
[OK] Vendor ID 1ff4 is present in the PCI devices.(num=1)
==== Device File Check ====
[OK] /dev/dxrt0 exists.
[OK] /dev/dxrt0 is a character device.
[OK] /dev/dxrt0 has correct permissions (0666).
==== Kernel Module Check ====
[OK] dxrt_driver module is loaded.
[OK] dx_dma module is loaded.
[OK] PCIe 02:00.0 driver probe is success.
==== Legacy Driver Installed Check ====
[INFO] /lib/modules/6.8.0-87-generic/kernel/drivers/dxrt_driver.ko ... NONE
[INFO] /lib/modules/6.8.0-87-generic/kernel/drivers/dx_dma.ko ... NONE
==== DKMS Driver Installed Check ====
[INFO] dxrt-driver-dkms/1.8.0-2, 6.8.0-87-generic, x86_64: installed
[INFO] /lib/modules/6.8.0-87-generic/updates/dkms/dxrt_driver.ko ... OK
[INFO] /lib/modules/6.8.0-87-generic/updates/dkms/dx_dma.ko ... OK

============================================================================
** Sanity check PASSED!
============================================================================
Help Command
To display usage instructions and available options for the Sanity Check script, run the following command:
sudo ./SanityCheck.sh help
This will print a summary of all supported options, including descriptions for all, dx_rt, and dx_driver.