Setting Up Environment
DX-AllSuite is an integrated environment construction tool for verifying and utilizing DEEPX devices. This guide resolves complex dependency issues and provides a consistent development experience across both local hosts and Docker containers.
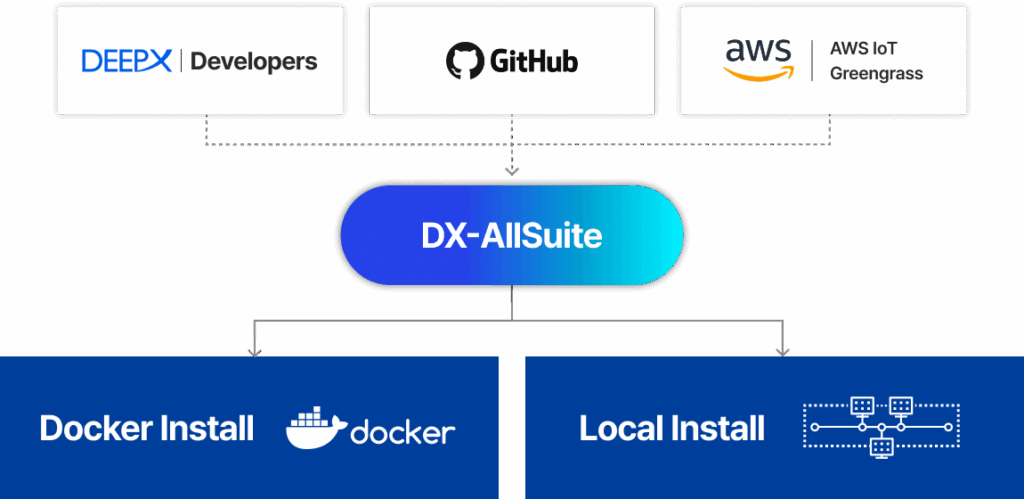
Figure. DX-AllSuite Supported Environments & Integrations.
Installation Summary
[Common] 1. Prerequisites: Acquire source code and understand virtual environment management policies.
[Optional] Choose Installation Path.
- [Route A] 2. Docker Installation: Isolated installation based on containers.
- [Route B] 3. Local Installation: Direct installation on the host OS.
Prerequisites
Follow these steps first to ensure a stable installation.
Repository Cloning and Submodule Synchronization
DX-AllSuite is a collection of several independent modules. If submodules are missing, compilation and runtime execution will not be possible. Please use the following commands exactly.
A. Clone Repository (Including Submodules)
# Via HTTPS (Recommended)
git clone --recurse-submodules https://github.com/DEEPX-AI/dx-all-suite.git

# Via SSH
git clone --recurse-submodules git@github.com:DEEPX-AI/dx-all-suite.git

cd dx-all-suite
B. (Optional) Update Existing Repository
If you have already cloned the repository but the subfolders are empty, you must perform manual initialization.
# Initialize and update submodules to the latest state
git submodule update --init --recursive

# Check submodule status (Success if no '-' prefix exists)
git submodule status
C. (Optional) Prepare Docker Environment
If you plan to use the Docker route but do not have Docker installed, use the provided automation script.
# Automatic installation of Docker and Docker Compose
./scripts/install_docker.sh
Automated Environment Management
DX-AllSuite automates the creation of Python virtual environments (venv) to prevent package conflicts. The installation scripts automatically configure independent environments optimized for each execution context, so users do not need to create virtual environments manually.
- Compiler Environment: Created at
dx-compiler/venv-dx-compiler - Runtime Environment: Created at
dx-runtime/venv-dx-runtime
If you are installing an individual module (e.g., dx-rt only), you must activate the corresponding virtual environment (source .../activate) created by the script to avoid installation failure.
SDK Workflow Guide
DX-AllSuite provides two paths for utilizing the DEEPX NPU, depending on whether you are bringing your own model or using a pre-optimized one. The SDK automatically manages the necessary virtual environments and dependencies to ensure a seamless development experience.
[Path A] Custom Model Inference Path
The standard workflow for converting and deploying user-trained models.
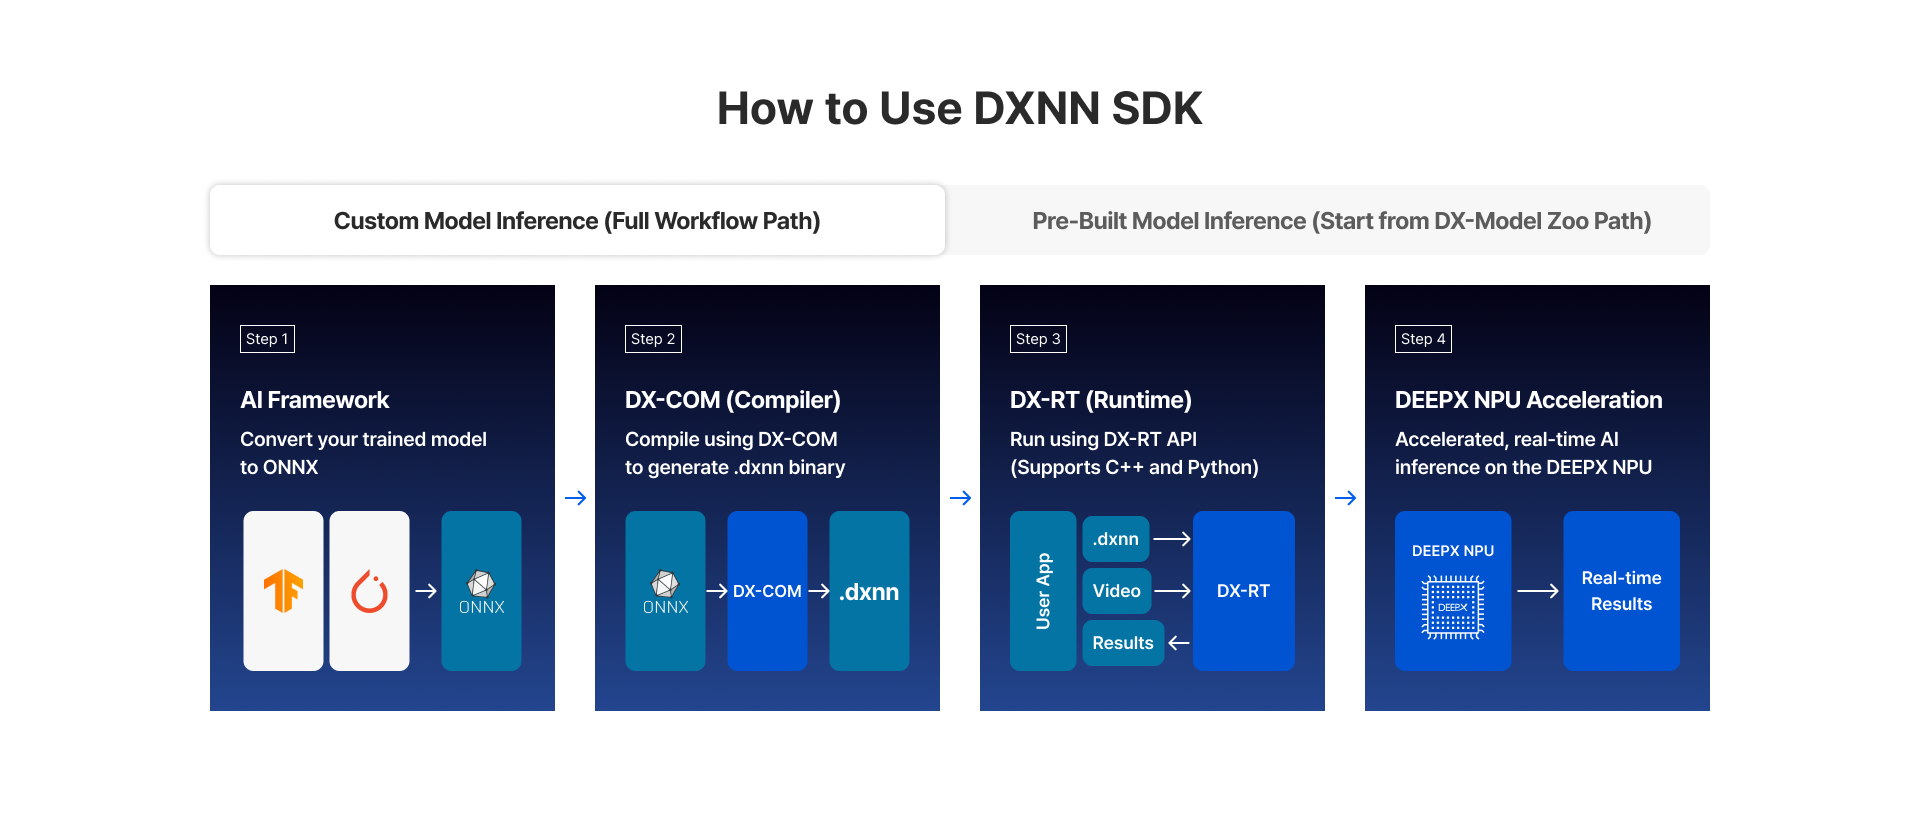
Figure. Custom Model Inference.
This path is designed for users who have a specific model architecture trained in frameworks and need to optimize it for DEEPX hardware.
- Step 1 (Source): Secure your trained models and source code from major AI frameworks such as PyTorch or TensorFlow.
- Step 2 (Export): Export the model to ONNX, the standard format recognized by DX-COM.
: Tip: Set input tensor size and use Opset 11 or higher to ensure maximum compatibility with NPU specifications. - Step 3 (DX-COM): Convert the ONNX model into an NPU-optimized
.dxnnbinary within the compiler virtual environment (venv-dx-compiler). - Step 4 (DX-RT): Load the generated model and run inference on the target device using the runtime virtual environment (
venv-dx-runtime). - Step 5 (NPU Acceleration): Verify real-time AI inference performance and inspect the final output.
[Path B] Pre-Compiled Model Path (Fast Track)
The "Fast Track" for immediate hardware validation.
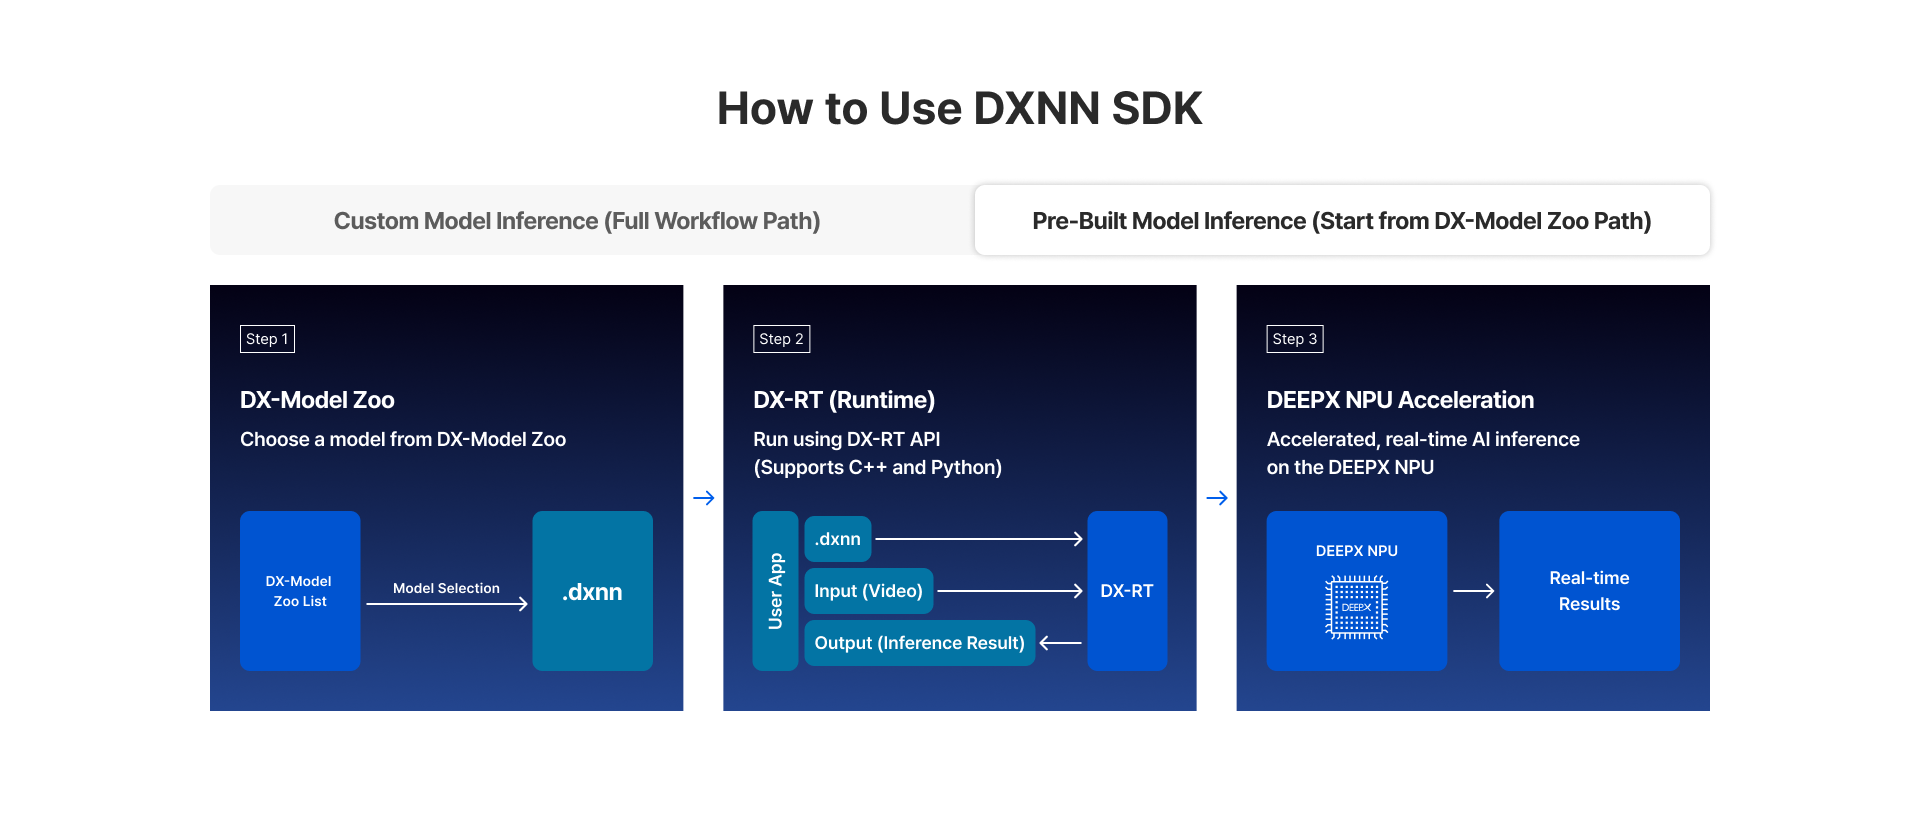
Figure. Pre-Built Model Inference.
This path is ideal for users who want to quickly benchmark DEEPX NPU performance or test hardware integration using industry-standard models.
- Step 1 (Select): Choose a pre-validated
.dxnnmodel from the DEEPX ModelZoo or sample data. - Step 2 (DX-RT): Load the selected model immediately in the runtime environment (
venv-dx-runtime) without a separate compilation process. - Step 3 (NPU Acceleration): Execute hardware-accelerated inference and analyze key performance indicators like FPS and Latency.
Docker Installation
Docker allows you to run DX-AllSuite in an isolated environment without complex dependency settings.
Host System Preparation (Critical)
Because Docker containers share the host kernel, the driver must be installed on the host system (PC) first for NPU hardware recognition.
A. Install NPU Driver (Host)
Execute the installation script on your Host PC first.
./dx-runtime/install.sh --target=dx_rt_npu_linux_driver
B. Prevent Service Daemon (dxrtd) Conflicts
Only one instance of dxrtd can run across the host and containers. Stop the host service before running the container.
sudo systemctl stop dxrt.service
Build Docker Image and Run Container
A. Build Image
Using the --all option builds an integrated image containing the Compiler, Runtime, and ModelZoo.
# Build integrated image (Based on Ubuntu 24.04)
./docker_build.sh --all --ubuntu_version=24.04

# Build specific environment only (Using --target)
./docker_build.sh --target=dx-runtime --ubuntu_version=24.04
B. Run Container
Run the container after the image build is complete.
./docker_run.sh --all --ubuntu_version=24.04
If you encounter X11 warnings or mount errors (e.g., cannot open display), it is likely due to the host OS using a Wayland session. Refer to Q2. X11 Session Warnings & Mount Errors (Wayland Issues) in 05. FAQ Troubleshooting Guide.
Container Access and Task Guide
A. DX-Compiler Environment (Model Conversion)
The DX-Compiler environment is used to generate hardware-optimized .dxnn binaries.
A-1. Accessing the Container
To perform tasks within the container, you must first log in to the running container's shell.
# 1. Run in Host Terminal: Enter the container
docker exec -it dx-compiler-24.04 bash

# 2. Inside Container: Navigate to the work directory
cd /deepx/dx-compiler/dx_com
The /deepx path is an absolute path internal to the container. This path does not exist on your host machine. Before executing commands, ensure your terminal prompt has changed to root@... or user@container_id.
A-2. Compiling Sample Model
Sample models are pre-downloaded to the ./sample_models/ directory upon installation. You can compile them using one of the following two methods.
- Method 1: Batch Compilation (Recommended)
Use the provided script to compile all sample models automatically.
../example/3-compile_sample_models.sh
- Method 2: Manual compilation (CLI)
For granular control, activate the virtual environment and use thedxcomtool directly.
source ../venv-dx-compiler/bin/activate  # Activate venv

dxcom -m sample_models/onnx/YOLOV5S-1.onnx \
      -c sample_models/json/YOLOV5S-1.json \
      -o output/YOLOV5S-1
A-3. Checking the Results
Upon successful completion, the optimized .dxnn binary will be generated in the output/ directory (or the path specified by the -o flag).
- Output File:
output/YOLOV5S-1.dxnn - Next Step: Transfer this file to the Runtime Environment for hardware execution.
B. DX-Runtime Environment (NPU Inference & Streaming)
The DX-Runtime environment is designed for executing model inference and processing high-performance video streams using DEEPX NPU hardware.
B-1. Accessing the Container and Status Check
Before running any inference, ensure the container can communicate with the NPU hardware.
# 1. Run from the host terminal: Enter the container
docker exec -it dx-runtime-24.04

# 2. Inside Container: Verify NPU hardware recognition
dxrt-cli -s
B-2. Running Sample Applications (dx_app)
This module provides inference demos for various vision tasks.
- Working Directory:
/deepx/dx-runtime/dx_app
cd /deepx/dx-runtime/dx_app

# 1. Prepare resources (Download .dxnn models and sample images)
./setup.sh

# 2. Run demo
./run_demo.sh 			# Run C++ based demo
./run_demo_python.sh 		# Run Python demo
Upon execution, the terminal will display a list of available demos (0, 1, 2...). Simply enter the corresponding number and press Enter to start.
B-3. Running the Streaming Framework (dx_stream)
This module is a GStreamer-based module optimized for real-time multi-channel video stream processing.
- Working Directory:
/deepx/dx-runtime/dx_stream
cd /deepx/dx-runtime/dx_stream

# 1. Prepare assets (Downloads streaming-specific models and video assets)
./setup.sh

# 2. Run the streaming demo (C++ based)
./run_demo.sh
You can select specific streaming scenarios by entering the scenario number displayed in the terminal.
Path Precautions
It is critical to distinguish between your Host terminal and the Container terminal to avoid "File not found" errors.
- Inside Docker Container: Always use the absolute path starting with
/deepx(e.g.,cd /deepx/dx-runtime/...). - Local Host Environment: Use relative paths based on your current directory (e.g.,
cd ./dx-runtime/...).
If you attempt to enter a path starting with /deepx in a Host terminal, the system will return a No such file or directory error. Always check if your prompt starts with root@... or user@container_id before navigating.
[Docker] Advanced Troubleshooting (Multi-Runtime Containers)
The dxrtd daemon must run as a single instance (Singleton) within the system. To launch multiple containers simultaneously, you must modify the Entrypoint to prevent automatic execution.
- Method 1: Modifying Dockerfile
Edit thedocker/Dockerfile.dx-runtimefile to disable the default startup command and replace it with a persistent idle state.
# 1. Comment out the existing settings
# ENTRYPOINT [ "/usr/local/bin/dxrtd" ]

# 2. Enable infinite wait settings to keep containers running
ENTRYPOINT ["tail", "-f", "/dev/null"]
- Method 2: Modifying docker-compose
If you are using Docker Compose, you can overwrite the default Entrypoint directly indocker/docker-compose.ymlwithin the corresponding service section.
services:
  dx-runtime:
    entrypoint: ["/bin/sh", "-c"]
    command: ["sleep infinity"]
When the above settings are applied, the NPU will be in a waiting state. After entering the container, run it manually using the dxrtd & command.
[Docker] Verification of Installation Results (Sanity Check)
This performs a final check to ensure that the installation was completed successfully and that the software and hardware communicate correctly.
A. Hardware Recognition Check (dxrt-cli)
Run the following command inside the container to verify that the NPU is visible and operational:
dxrt-cli -s
Success Checklist
If your output meets the following three conditions, the hardware integration is successful:
- [x] Device Recognition:
Device 0: M1(or your specific model) is displayed. - [x] Version Information: Valid version numbers appear for
RT Driver version,FW version, etc. - [x] Daemon Status: No error messages such as "
Other instance of dxrtd is running" are present.
[Example of Normal Output]
DX-RT v3.2.0
========================================================
* Device 0: M1, Accelerator type
--------------------- Version ---------------------
* RT Driver version : v2.1.0
* FW version :      v2.5.0
-------------------------------------------------------
... (Continued)
B. System Consistency Check
This script performs a batch check to ensure all individual modules are correctly placed in their designated paths and are ready for execution.
# Check the integrity of the runtime environment
./dx-runtime/scripts/sanity_check.sh
If [OK] or PASS is output for all items, you are ready to start service development.
Local Installation
Installing DX-AllSuite directly on the Host OS ensures maximum hardware performance and seamless compatibility between all software modules. This method is recommended for production environments and advanced performance benchmarking.
- Action: DX-Compiler Local Installation Guide [Link]
DX-Compiler Installation (DX-COM, DX-TRON)
DX-Compiler (DX-COM) can be used as a CLI tool or a Python module on supported Linux distributions.
Differences in Usage
- CLI Tool (Command Line Interface): Perform compilation by entering
dxcomcommands directly in the terminal (Bash). Ideal for quick execution and automated shell scripts without additional coding. - Python Module (Library): Call functions or classes via
import dx_comwithin your Python scripts. This is the preferred method for integrating the compiler into your existing AI training or automation pipelines.
The standalone executable distribution method is no longer supported. This guide describes the latest Wheel-based installation workflow, which ensures better dependency management and Python environment integration.
A. Pre-Installation Requirements
Before installing DX-COM, you must install the following system libraries to support core utilities and graphical operations.
libgl1-mesa-glx: OpenGL runtime support for graphics processinglibglib2.0-0: Core utility library (related to GNOME/GTK)
Installation Command
sudo apt-get update
sudo apt-get install -y --no-install-recommends libgl1-mesa-glx libglib2.0-0 make
B. Installation Method
Supported Environments
- OS: Linux (x86_64)
- Python Version: 3.8, 3.9, 3.10, 3.11, 3.12, 3.13, 3.14 (The installation script will automatically detect your version)
Integrated Package Installation
The provided install.sh script handles everything in one go, including Python version detection and package installation.
# Run the interactive installation script (recommended)
./dx-compiler/install.sh
C. Verify and Usage
After installation, activate the virtual environment (venv-dx-compiler) to verify the setup.
# 1. Activate the Virtual Environment
source ./dx-compiler/venv-dx-compiler/bin/activate

# 2. Verify Installed Version (CLI and Python Modules)
dxcom --version
python3 -c "import dx_com; print(dx_com.__version__)"

# 3. Access Help Documentation
dxcom -h
- Sample Data Location:
./dx-compiler/dx_com/sample_models/
If the automatic sample data download fails, you can manually fetch the assets using the following scripts:
./dx-compiler/example/1-download_sample_models.sh(Model data)./dx-compiler/example/2-download_sample_calibration_dataset.sh(Calibration data)
D. DX-TRON (GUI Visualizer)
DX-TRON is a visual analysis tool for inspecting model structures and workload distribution. Choose the execution mode that fits your environment:
- Local Execution (Desktop): Type
dxtronin the terminal or execute the following script:
./dx-compiler/run_dxtron_appimage.sh
- Web Server Execution (Remote/Docker): Run the web server script and specify a port:
./dx-compiler/run_dxtron_web.sh --port=8080
Then, access http://localhost:8080 in your browser.
-
Windows Users: You can download the dedicated Windows installer directly from the DEEPX Developer Portal.
-
Action: DX-Runtime Installation Guide [Link]
DX-Runtime Installation (RT, Driver, FW, App, Stream)
The DX-Runtime stack is the core software layer required to control DEEPX NPU hardware and execute AI applications. Each component is managed as a submodule within the ./dx-runtime directory.
A. Building and Installing Modules
Depending on your requirements, you can perform a full installation or target specific modules to save time.
# Option 1: Install all modules (Driver, FW, RT, App, Stream)
./dx-runtime/install.sh --all

# Option 2: Full install excluding firmware
# (Use this if your NPU already has the latest FW version)
./dx-runtime/install.sh --all --exclude-fw

# Option 3: Install a specific module only
./dx-runtime/install.sh --target=<module_name>
B. Firmware (DX-FW) Update and Activation
Updating the firmware is a critical process. To ensure the hardware logic is correctly initialized, follow these steps precisely.
Step 1. Update the Firmware
You can update the firmware using the automated installation script or the dedicated CLI tool.
# Method 1. Using the installation script
./dx-runtime/install.sh --target=dx_fw

# Method 2. Manual update using dxrt-cli
dxrt-cli -u ./dx-runtime/dx_fw/m1/X.X.X/mdot2/fw.bin
Step 2. Perform a Cold Boot
It is strongly recommended to completely shut down the system, turn off the power, and then turn it back on. A simple 'Restart' may not be sufficient for hardware initialization.
Step 3. System Reboot
After installation is complete, be sure to perform sudo reboot to activate the installed kernel driver.
[Local] Installation Verification (Sanity Check)
Once the local installation is finished, perform a final check to confirm that the hardware and software are communicating correctly.
A. Hardware and Version Check
Run the following command to display information about the NPU devices recognized by the system.
dxrt-cli -s
Success Checklist
- [x] Device Recognition: Does it display
Device 0: M1? - [x] Version Info: Do
RT Driver,PCIe Driver, andFW versionshow valid numbers (e.g., v1.x.x)? - [x] Status: Are real-time metrics for Voltage, Clock, and Temperature visible at the bottom?
B. System Integrity Check
Run the batch sanity script to verify that all modules are located in their designated paths.
./dx-runtime/scripts/sanity_check.sh
If any item returns a FAIL or Not Found, please revisit the module installation steps (Section 3-2) to ensure all components were compiled correctly.