DX-APP Installation and Build
This guide describes the system requirements and the installation instructions on Linux and Windows to use DX-APP.
Overview & System Requirements
This section describes the hardware and software requirements for running DX-APP.
Hardware Requirements
- CPU: amd64(x86_64), aarch64(arm64)
- RAM: 8GB RAM (16GB RAM or higher is recommended)
- Storage: 4GB or higher available disk space
The system must support connection to an M1 M.2 module with the M.2 interface on the host PC.
The NPU Device Driver and DX-RT Library must be installed. Refer to DX-RT User Manual for step-by-step installation instructions.
Installation on Linux
This section describes the software requirements and installation steps for setting up DX-APP on Ubuntu-based and Debian-based systems.
Software Requirements on Linux
To run DX-APP on Linux, the following components must be installed.
- OS: Ubuntu 18.04 / 20.04 / 22.04 / 24.04 (x64) and Debian 12 / 13 (x64)
- Deepx M1 Runtime Lib Version: v3.0.0 or higher
All required components are included in the DXNN All Suite (DX-AS) package.
Prerequisites Setup
Step 1. Install DX-RT Device Driver
To set up the build Environment, refer to Section. Linux Device Driver Installation in DX-RT User Manual.
Once the DX-RT device driver is installed, the system should include both the PCIe driver and the runtime driver. You can verify the installation by checking the loaded kernel modules.
lsmod | grep dx

# dxrt_driver 53248 2
# dx_dma 475136 7 dxrt_driver
Step 2. Install DX-RT Library
To install the DX-RT library and NPU device driver, refer to Section. Build Guide for Cross-compile in DX-RT User Manual.
Once DX-RT is built, the runtime library and header files are installed in the following directory.
- Libraries:
/usr/local/lib - Headers:
/usr/local/include
set(DXRT_INSTALLED_DIR /usr/local)
If necessary, you can modify the installation path by editing cmake/toolchain.x86_64.cmake.
DX-APP Application Setup
Step 1. DX-APP Installation Options
You can check the available DX-APP installation options by running the following command.
./install.sh # --help
You can view more installation options by entering the --help flag.
Step 2. OpenCV Installation Options
If you want to enable CPU/GPU acceleration, OpenCV must be manually installed on your system.
During the OpenCV build process, setting the following flags are needed.
TBB=ON, IPP=ON, CUDA=ON
If OpenCV is already installed, manually set the OpenCV_DIR path in your toolchain file.
set(CMAKE_SYSTEM_NAME Linux)
set(CMAKE_SYSTEM_PROCESSOR x86_64)
set(DXRT_INSTALLED_DIR /usr/local)
set(OpenCV_DIR /your/opencv/installation/dir)
set(onnxruntime_LIB_DIRS /usr/local/lib)
Step 3. Build and Run DX-APP
To build dx_app, run the following command.
./build.sh ## Defaults to minimal build (run_demo C++ targets). Use --clean for a clean build.
To download required models and sample videos, run the following command.
./setup.sh
Assets are downloaded and placed in the assets/ directory.
- Models: stored under
assets/models/ - Videos: stored under
assets/videos/
Running setup.sh beforehand is optional. When you run any individual example, missing models are automatically downloaded on demand. Videos are also auto-downloaded when a --video path is specified but the file does not exist.
The sample models (.dxnn) and dataset images are provided for evaluation and development purposes only and are not licensed for commercial deployment. For full license details, see Appendix: Third-Party License Notice.
setup.sh Options
| Option | Description |
|---|---|
--all | Download all models non-interactively |
--dry-run | List models that would be downloaded without downloading |
--list | List available models without downloading |
--workers=<N> | Parallel download threads (default: 4) |
--category=<name> | Download models of a specific category only |
--models <m1> [m2...] | Download specific models by name |
--no-json | Skip JSON metadata file downloads |
--manifest=<path> | Use an alternate manifest JSON file |
--force | Force overwrite if files already exist (default) |
--no-force | Skip download if the file already exists |
--force-remove-models | Force remove models if they exist |
--force-remove-videos | Force remove videos if they exist |
--verbose | Show detailed progress output |
In internal-network environments, the setup flow can use the internal DX-ModelZoo source automatically when the intranet mode is enabled by the surrounding environment.
For most users, running only ./setup.sh is sufficient. Contributor-facing setup details are documented separately in the developer guides.
In internal environments, DX-APP can use the internal DX-ModelZoo source to prepare model assets without requiring manual model-by-model input during the standard setup flow.
Post-Processing Unit (PPU) Acceleration Integration
DX-APP utilizes PPU Acceleration to maximize inference efficiency on NPU hardware.
The PPU is engineered to offload computationally intensive post-processing tasks, specifically bounding box decoding and score thresholding, directly to the NPU. This critical architectural shift mitigates the CPU overhead traditionally incurred during post-processing, leading to a substantial enhancement in overall inference throughput.
Key Operational Benefits
- Improved Processing Speed: Achieved by enabling the parallel execution of both the core inference and the post-processing operations.
- Enhanced Throughput: Provides a significant advantage for real-time applications that require sustained high frame rates.
PPU-Enabled Models
DX-APP includes 11 PPU-accelerated model variants across multiple tasks. To run PPU models interactively, use ./run_demo.sh and select "PPU Pipeline", or use the example runner / DX Model Tool:
# Interactive — select PPU from the category menu
scripts/run_examples.sh
./scripts/dx_tool.sh run

# Non-interactive
./scripts/dx_tool.sh run --lang cpp --category ppu
Available PPU models: YOLOv5S, YOLOv7, YOLOv7x, YOLOv8N, YOLOv8S, YOLOv9T, YOLOv10N, YOLOv11N, YOLOv12N, SCRFD500M, YOLOv5Pose.
Step 4. Resolve Shared Library Errors
If you encounter shared library errors (e.g., libdxrt.so), update the system’s library cache.
# Copy your library to /usr/local/lib
sudo cp your_library.so /usr/local/lib

# Update the system's library cache
sudo ldconfig
Installation on Windows
This section details the software requirements and sequential installation steps necessary for setting up the DX-APP environment on Windows systems.
- Stage 1: Prerequisites - Verify system requirements
- Stage 2: Core Runtime - Install the official DX-RT and M1 Driver
- Stage 3: Toolchain - Install Visual Studio 2022 (C++ compiler/build environment)
- Stage 4: Build & Install - Compile DX-APP source code using build.bat or the VS IDE
Software Requirements on Windows
To run DX-APP on Windows, the following components must be installed.
- OS: Windows 10 or later
- Python: Version 3.8 or higher (required for Python module support)
- Compiler: Visual Studio Community 2022 (required for building C++ examples)
Install DX-RT and M1 Windows Driver
DEEPX provides an official Windows installer for DXNN Runtime (DX-RT), which includes the required runtime libraries and M1 device driver.
Prerequisite checklist (DX-RT Windows Driver)
- Microsoft Visual C++ 2015-2022 Redistributable (x64)
- DEEPX NPU device (e.g., DX-M1) connected via PCIe slot, M.2 slot, or USB 4.0 (USB4 PCIe tunneling required)
- Administrator privileges for driver installation
Visual Studio Community 2022 is the build toolchain (IDE + compiler), while the Microsoft Visual C++ 2015-2022 Redistributable provides the runtime DLLs needed to run the built apps.
For detailed instructions, refer to DeepX NPU Windows Runtime & Driver.
Install Visual Studio Community 2022
To use DX-APP on Windows, Visual Studio Community 2022 must be installed with appropriate development tools.
Installation Step
- Step 1. Download Visual Studio Community 2022
- Step 2. Launch the installer and select the following workload
: Desktop development with C++ - Step 3. (Optional) Select additional workloads or individual components as needed
- Step 4. Click Install to begin the installation process
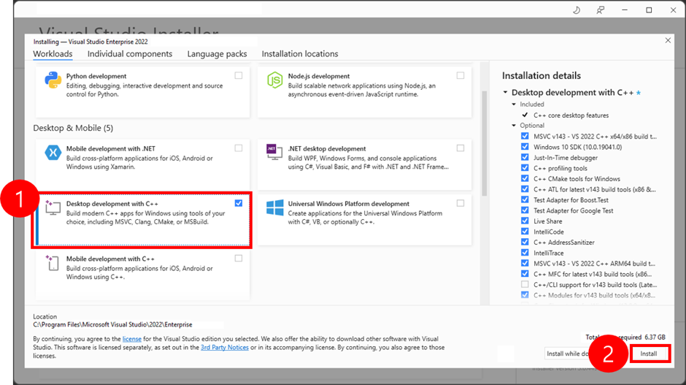
Visual Studio Community 2022 is required; other versions are not tested.
Install VCPKG
VCPKG is a C++ package manager used for handling third-party dependencies like OpenCV.
If you are using Visual Studio Community 2022, VCPKG is pre-installed, so no separate installation is necessary.
If manual installation is required, follow the steps below.
- Step 1. Download the vcpkg package from GitHub
- Step 2. Open Command Prompt and Run the following command
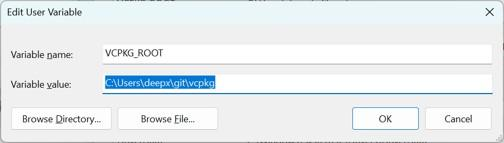
- Step 3. Set the user variables
: Variable Name:VCPKG_ROOT
: Variable Value: Path to your vcpkg installation directory
This step is essential to allow Visual Studio to automatically detect and use VCPKG-managed packages like OpenCV.
Build and Install dx_app in Visual Studio Community 2022
To build and run the dx_app application on Windows, follow the steps below using Visual Studio Community 2022.
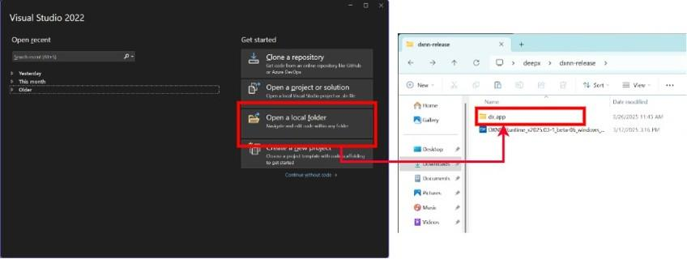
Step 1. Open Project Folder
- Step 1-1. Launch Visual Studio Community 2022
- Step 1-2. From the start screen, select Open a local folder
- Step 1-3. Navigate to and select the
dx_appproject folder
You must use Visual Studio 2022. Support for other versions (VS 2019, VS Code, etc.) has not been tested and compatibility cannot be guaranteed.
Step 2. Project Configuration
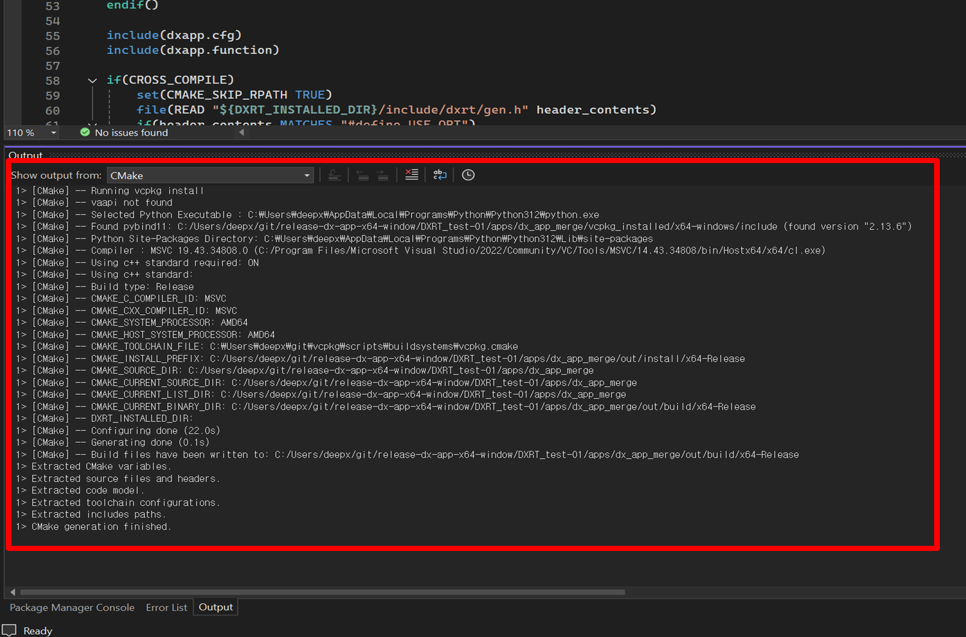
Upon opening the project,
- Dependencies specified in
vcpkg.jsonwill be automatically downloaded and installed into thevcpkg_installeddirectory. - CMake will automatically generate the build cache and configuration.
Step 3. (Optional) Edit CMakeSettings
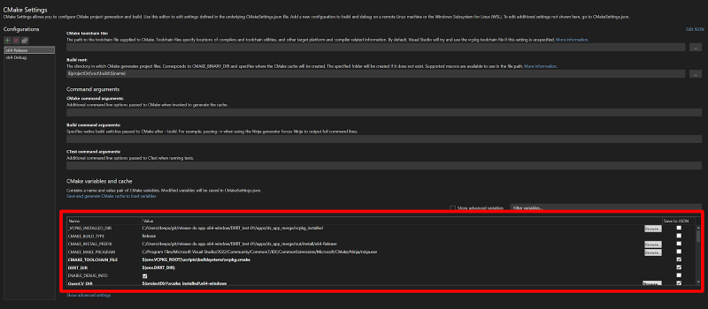
If needed, you can manually specify the following environment variables in CMakeSettings.json.
DXRT_DIR: Path to the installed DX-RT runtimeOpenCV_DIR: Path to the OpenCV installation (if manually installed)
{
    "name": "CMAKE_TOOLCHAIN_FILE",
    "value": "${env.VCPKG_ROOT}/scripts/buildsystems/vcpkg.cmake",
    "type": "STRING"
},
{
    "name": "DEEPX_SDK_DIR",
    "value": "path/to/dx_rt/installed",
    "type": "STRING"
},
{
    "name": "OpenCV_DIR",
    "value": "${projectDir}/vcpkg_installed/x64-windows/share/opencv",
    "type": "STRING"
}
Step 4. Register PATH Variable
Ensure the required runtime libraries are accessible with the system’s PATH environment variable.
DXRT_DIRis referenced in CMAKE as{env.DXRT_DIR}.
If you are using dx_app/vcpkg.json, OpenCV will be automatically downloaded and installed into vcpkg_installed/x64-windows directory during CMake configuration step.
Step 5. Build and Install dx_app
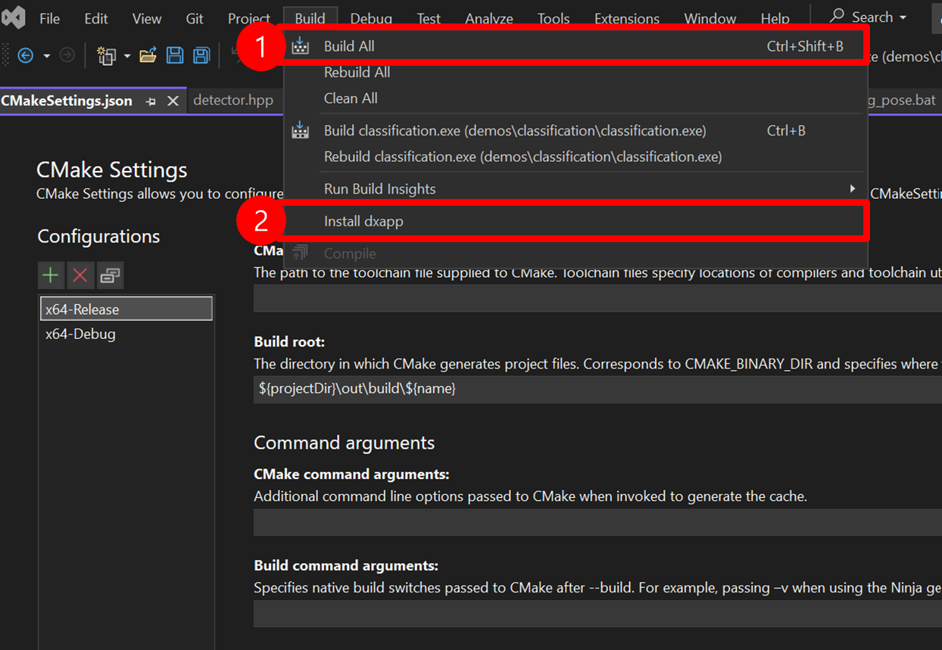
To build and install the dx_app application
- Step 5-1. Go to the Build menu
- Step 5-2. Click Build All (or Rebuild All) to begin the build process
Upon successful compilation, the application executable will be generated under the bin/ directory.
Alternative Build Method: Using build.bat
The updated build.bat now generates build_internal.bat from CMakeSettings.json and drives both the DX-APP build and the pybind C++ module build.
Key behaviors
- Generates
build_internal.batbased on the selected CMake configuration (toolchain, paths, generator). - Validates environment (e.g.,
DXRT_DIR) and cleans stale CMake cache to avoid generator/toolset mismatches. - Builds and installs DX-APP executables/libraries, then builds the pybind C++ module.
Prerequisites
DXRT_DIRset to the DX-RT installation directory- Visual Studio 2022 with Desktop development with C++ workload
- CMake available in
PATH
Usage
From the project root
build.bat
build_internal.bat is written alongside, then executed to configure, build, and install outputs. Use the generated dxapp.sln (under the build directory, ./out/build/x64-Release/) if you want to open in Visual Studio 2022 for further development.
Visual Studio solution Generation
After successful execution of build.bat, the scripts generates the necessary solution files for development within the IDE.
- [Important] Open Solution: Open the generated solution file at
out\build\x64-Release\dxapp.slnusing Visual Studio 2022
NOTE. Opening with other versions may cause compatibility issues or build failures. - Access & Customization: Use Visual Studio 2022 for debugging, development, and further customization. All project targets and configurations are accessible through the VS 2022 interface.
Build Output Structure
dx_app/
├── out/                   # Build directory created by build.bat
│   ├── build/             # CMake build files
│   │   ├── x64-Release/   # Release build configuration
│   │   │   ├── dxapp.sln  # Visual Studio 2022 solution file
│   │   │   ├── *.vcxproj  # Project files for each target
│   │   │   └── ...        # Other build artifacts
│   │   └── ...
│   └── install/           # Installation directory
├── bin/                   # Installed executables
└── lib/                   # Installed libraries
Run Example Executable Files On Windows
After building and installing dx_app, you can execute the demo applications using provided batch scripts.
Step 1. Execute setup.bat
Run the setup.bat script to automatically download all required models and sample videos.
- The downloaded assets will be placed in the
assetsfolder. - The assets include models for Classification, Object Detection, and Segmentation.
Step 2. Run Examples
You can run the examples using the same command line instructions as in Linux, but using the .exe extension for executables.
classification example
./bin/efficientnet_lite0_async.exe -m ./assets/models/efficientnet-lite0_256x256.dxnn -i ./sample/ILSVRC2012/0.jpeg
object detection example
./bin/yolov8n_sync.exe -m ./assets/models/yolov8-n_640x640.dxnn -i ./sample/img/sample_kitchen.jpg -l 10