Model Inference
This chapter explains how to run AI model inference using the DX-RT SDK. It covers the model file format, step-by-step inference workflow, support for multi-device execution, tensor data handling, and profiling tools. You can also find guidance on building complete applications, enabling hardware acceleration, and optimizing CPU task throughput when using DX-RT in performance-critical environments.
Model File Format
The original ONNX model is converted by DX-COM into the following structure.
Model dir.
    └── graph.dxnn
graph.dxnn
: A unified DEEPX artifact that contains NPU command data, model metadata, model parameters.
This file is used directly for inference on DEEPX hardware.
Inference Workflow
Here is the inference workflow of the DXNN Runtime.
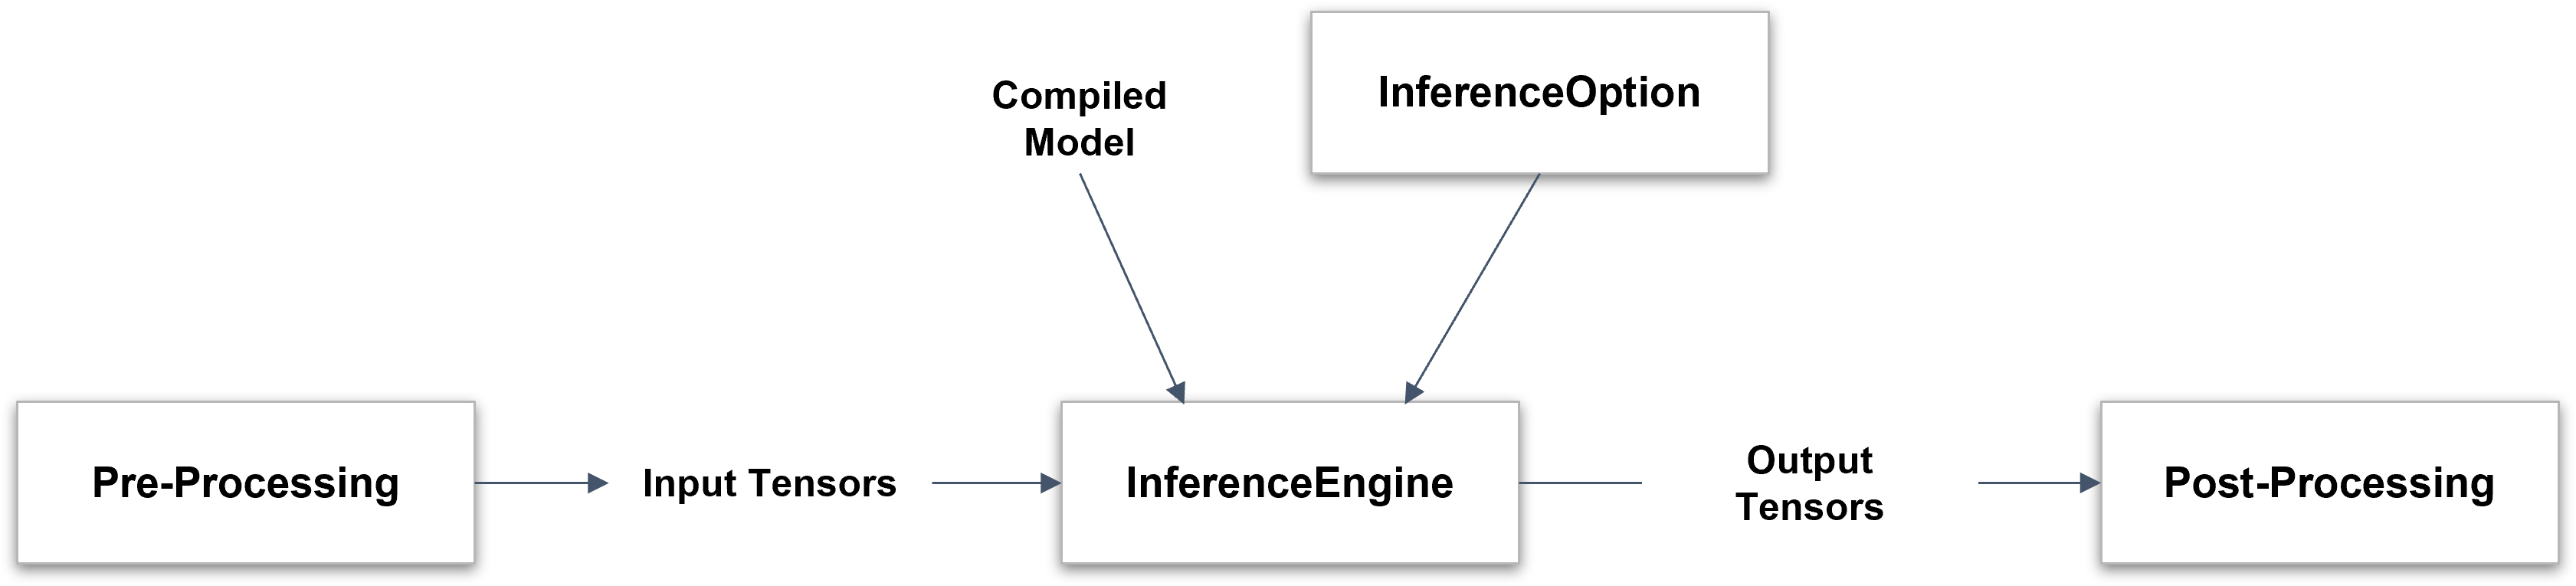
Figure. Inference Workflow
- Compiled Model and optional InferenceOption are provided to initialize the InferenceEngine.
- Pre-processed Input Tensors are passed to the InferenceEngine for inference.
- The InferenceEngine produces Output Tensors as a result of the inference.
- These outputs are then passed to the Post-Processing stage for interpretation or further action.
Prepare the Model
Choose one of the following options.
- Use a pre-built model from DX ModelZoo
- Compile an ONNX model into the DX-RT format using DX-COM (Refer to the DEEPX DX-COM User Manual for details.)
Configure Inference Options
Create a dxrt::InferenceOption object to configure runtime settings for the inference engine. This allows you to control device selection, NPU core binding, CPU task execution, and buffer allocation.
Available Configuration Options
-
devices(default: empty = all devices)
Specifies which device IDs to use for inference. If empty, all available devices are used.option.devices = {0, 1}; // Use device 0 and device 1 only -
boundOption(default:NPU_ALL)
Selects which NPU core(s) inside the device to use for inference.NPU_ALL: Uses all NPU cores simultaneously (recommended for maximum throughput)NPU_0,NPU_1,NPU_2: Uses only a single specific NPU coreNPU_01,NPU_12,NPU_02: Uses a pair of NPU cores
option.boundOption = dxrt::InferenceOption::NPU_ALL; -
useORT(default: depends on build configuration)
Enables ONNX Runtime for executing CPU-side tasks that are not supported by the NPU.true: Both NPU and CPU (via ONNX Runtime) tasks are executedfalse: Only NPU tasks are executed
option.useORT = true; // Enable CPU fallback for unsupported operations -
bufferCount(default:DXRT_TASK_MAX_LOAD_VALUE)
Specifies the number of internal buffers allocated for inference. Higher values may improve throughput in pipelined scenarios.option.bufferCount = 4; // Allocate 4 inference buffers
Example Usage
dxrt::InferenceOption option;
option.devices = {0};                              // Use only device 0
option.boundOption = dxrt::InferenceOption::NPU_ALL;  // Use all cores
option.useORT = true;                              // Enable CPU tasks
option.bufferCount = 4;                            // Use 4 buffers

auto ie = dxrt::InferenceEngine("model.dxnn", &option);
Load the Model into the Inference Engine
Create a dxrt::InferenceEngine instance using the path to the compiled model directory. Hardware resources are automatically initialized during this step.
If dxrt::InferenceOption is not provided, a default option is applied.
// Option 1: Load from file path
auto ie = dxrt::InferenceEngine("yolov5s.dxnn");

// Option 2: Load from file path with options
auto ie = dxrt::InferenceEngine("yolov5s.dxnn", &option);

// Option 3: Load from memory buffer
std::ifstream file("yolov5s.dxnn", std::ios::binary | std::ios::ate);
std::streamsize yolov5s_buffer_size = file.tellg();
file.seekg(0, std::ios::beg);
std::vector<uint8_t> yolov5s_buffer(yolov5s_buffer_size);
if (file.read(reinterpret_cast<char*>(yolov5s_buffer.data()), yolov5s_buffer_size)) {
    auto ie = dxrt::InferenceEngine(yolov5s_buffer.data(), yolov5s_buffer_size);
}

// Option 4: Load from memory buffer with options
auto ie = dxrt::InferenceEngine(yolov5s_buffer.data(), yolov5s_buffer_size, &option);
Connect Input Tensors
Prepare input buffers for inference.
The following example shows how to initialize the buffer with the appropriate size.
std::vector<uint8_t> inputBuf(ie.GetInputSize(), 0);
Refer to DX-APP User Guide for practical examples on connecting inference engines to image sources such as cameras or video, along with the preprocessing routines.
Inference
DX-RT provides both synchronous and asynchronous execution modes for flexible inference handling.
Run - Synchronous Execution
Use the dxrt::InferenceEngine::Run() method for blocking, single-core inference.
auto outputs = ie.Run(inputBuf.data());
- This method processes input and output on the same thread.
- This method is suitable for simple and sequential workloads.
Run - Asynchronous Execution
With Wait()
Use RunAsync() to perform the inference in non-blocking mode, and retrieve results later with Wait().
auto jobId = ie.RunAsync(inputBuf.data());
auto outputs = ie.Wait(jobId);
- This method is ideal for parallel workloads where inference can run in the background.
- This method is continuously executed while waiting for the result.
With Callback function
Use a callback function to handle output as soon as inference completes.
std::function<int(vector<shared_ptr<dxrt::Tensor>>, void*)> postProcCallBack = \
    [&](vector<shared_ptr<dxrt::Tensor>> outputs, void *arg)
    {
        /* Process output tensors here */
        ... ...
        return 0;
    };
ie.RegisterCallback(postProcCallBack)
- The callback is triggered by a background thread after inference.
- You can pass a custom argument to track input/output pairs.
Output data is only valid within the callback scope.
Process Output Tensors
Once inference is complete, the output tensors are processed using Tensor APIs and custom post-processing logic. You can find the templates and example code in DX-APP to help you implement post-process smoothly.
As noted earlier, using callbacks allows for more efficient and real-time post-processing.
Multiple Device Inference
This feature is not applicable to single-NPU devices. Basically, the inference engine schedules and manages multiple devices in real time.
If the inference option is explicitly set, the inference engine may only use specific devices during real-time inference for the model.
Data Format of Device Tensor
Compiled models use the NHWC format by default.
However, the input tensor formats on the device side may vary depending on the hardware’s processing type.
Input Tensor Formats
| Type | Compiled Model Format | Device Format | Data Size |
|---|---|---|---|
Formatter | [N, H, W, C] | [N, H, W, C] | 8-bit |
IM2COL | [N, H, W, C] | [N, H, align64(W*C)] | 8-bit |
- Formatter Type Example:
[1, 3, 224, 224] (NCHW) -> [1, 224, 224, 3] (NHWC) - IM2COL Type Example:
[1, 3, 224, 224] (NCHW) -> [1, 224, 224*3+32] (NH, aligned width x channel)
Output Tensor Formats
The output tensor format is also aligned with the NHWC format, but with padding applied for alignment.
| Type | Compiled Model Format | Device Format |
|---|---|---|
Aligned NHWC | [N, H, W, C] | [N, H, W, align64(C)] |
- Output Example:
[1, 40, 52, 36] (NCHW) -> [1, 52, 36, 40+24](Channel size is aligned for optimal memory access.)
Post-processing can be performed directly without converting formats.
The API to convert from device format to NCHW/NHWC format will be supported in the next release.
Automatic Dummy Padding/Slicing (USE_ORT=OFF)
Starting with v3.0.0, when ONNX Runtime is disabled (built with USE_ORT=OFF or runtime option InferenceOption.use_ort = False), the DX-RT runtime automatically:
- Pads input tensors to the NPU-aligned format required by each task (e.g., IM2COL, align64 width/channel), and
- Slices any alignment padding from output tensors before returning them to the application.
As a result, applications no longer need to manually attach input dummy bytes or remove output dummy bytes in non-ORT inference paths. This behavior applies to both C++ and Python APIs, including PPU models. If you provide user output buffers, ensure the buffer size is at least ie.GetOutputSize() (C++) or ie.get_output_size() (Python).
- This automatic handling is internal to the runtime’s NPU format processing and does not change model-visible tensor shapes reported by the APIs.
- When
use_ort = True, CPU-side execution for unsupported subgraphs is enabled via ONNX Runtime; NPU tasks still follow the same alignment policy internally.
Profile Application
Extract Profiling Data Using dxrun
When you run a model with the --profiler option using dxrun, a profiler.json file is automatically generated in the working directory.
dxrun -m model.dxnn --profiler
# Check the generated profiler.json file
This provides a quick way to collect profiling data without modifying your application code.
Gather Timing Data per Event
You can profile events within your application using the Profiler APIs. Please refer to Section. API reference.
Enable the Profiler
Before collecting profiling data, enable the profiler and configure its output options.
// Enable the profiler
dxrt::Configuration::GetInstance().SetEnable(dxrt::Configuration::ITEM::PROFILER, true);

// Set attributes to show data in console and save to a file
dxrt::Configuration::GetInstance().SetAttribute(dxrt::Configuration::ITEM::PROFILER,
    dxrt::Configuration::ATTRIBUTE::PROFILER_SHOW_DATA, "ON");

dxrt::Configuration::GetInstance().SetAttribute(dxrt::Configuration::ITEM::PROFILER,
    dxrt::Configuration::ATTRIBUTE::PROFILER_SAVE_DATA, "ON");
After the application finishes, profiler.json is created in the working directory.
Get Per-Job Metrics with GetJobMetrics()
Use dxrt::Profiler::GetJobMetrics() to retrieve detailed timing breakdowns for a specific inference job. This is the recommended way to access per-job inference timing data programmatically.
Call it immediately after Wait() returns with the corresponding job ID.
auto& profiler = dxrt::Profiler::GetInstance();

int jobId = ie.RunAsync(inputBuf.data());
auto outputs = ie.Wait(jobId);

auto jm = profiler.GetJobMetrics(jobId);
if (jm.valid) {
    // NPU task metrics (per device)
    auto npu = jm.GetTask("npu_0");
    if (npu.valid) {
        auto& dev = npu.devices[0];         // device 0 metrics
        double h2d      = dev.h2d_us;       // Host-to-Device transfer (µs)
        double inference = dev.inference_core_all_us; // NPU compute (µs)
        double d2h      = dev.d2h_us;       // Device-to-Host transfer (µs)
        double total    = dev.total_us;     // End-to-end NPU task time (µs)
    }

    // CPU task metrics (when USE_ORT is enabled)
    auto cpu = jm.GetTask("cpu_0");
    if (cpu.valid) {
        double cpuExec = cpu.cpu_task_us;   // CPU op execution time (µs)
    }
}
JobMetrics Structure
| Field | Type | Description |
|---|---|---|
tasks | vector<TaskMetrics> | One entry per task that participated in the job |
valid | bool | false if the job ID was not found |
GetTask(name) | method | Safe lookup by task name; returns valid=false if not found |
TaskMetrics Structure
| Field | Type | Description |
|---|---|---|
task_name | string | Task name (e.g., "npu_0", "cpu_0") |
devices | map<int, NpuDeviceMetrics> | Per-device NPU metrics (NPU tasks only) |
cpu_task_us | double | CPU task execution time in µs (CPU tasks only; 0 for NPU tasks) |
valid | bool | true if this task was measured |
NpuDeviceMetrics Structure
| Field | Type | Description |
|---|---|---|
input_format_us | double | NPU input format handler time (µs) |
h2d_us | double | Host-to-Device PCIe transfer time (µs) |
inference_core_all_us | double | NPU compute time across all cores (µs) |
inference_core_0_us | double | NPU compute time on core 0 (µs) |
inference_core_1_us | double | NPU compute time on core 1 (µs) |
inference_core_2_us | double | NPU compute time on core 2 (µs) |
d2h_us | double | Device-to-Host PCIe transfer time (µs) |
output_format_us | double | NPU output format handler time (µs) |
total_us | double | End-to-end NPU task time (µs) |
valid | bool | true if at least one of H2D/NPU/D2H was measured |
GetJobMetrics() is the recommended API. The older GetPerformanceData() and GetPerformanceDataByDevice() methods are deprecated and will be removed in a future release.
Record Custom User Events
You can also record arbitrary named events in your application to include them in the profiler output.
auto& profiler = dxrt::Profiler::GetInstance();
profiler.Start("my_preprocess");
// ... preprocessing code ...
profiler.End("my_preprocess");
User events are included in profiler.json when saved via Save(file, userEvents).
Visualize Profiler Data
You can visualize the profiling results using the following Python script.
python3 tool/profiler/plot.py -i profiler.json
This generates timeline chart image files from the profiling data. When multi-device profiling data is present, separate images are generated per device (e.g., profiler_Device_0.png, profiler_Device_1.png). If the number of jobs exceeds the limit (default: 200), the output is automatically split into multiple images per chunk (e.g., profiler_Device_0_part1.png).
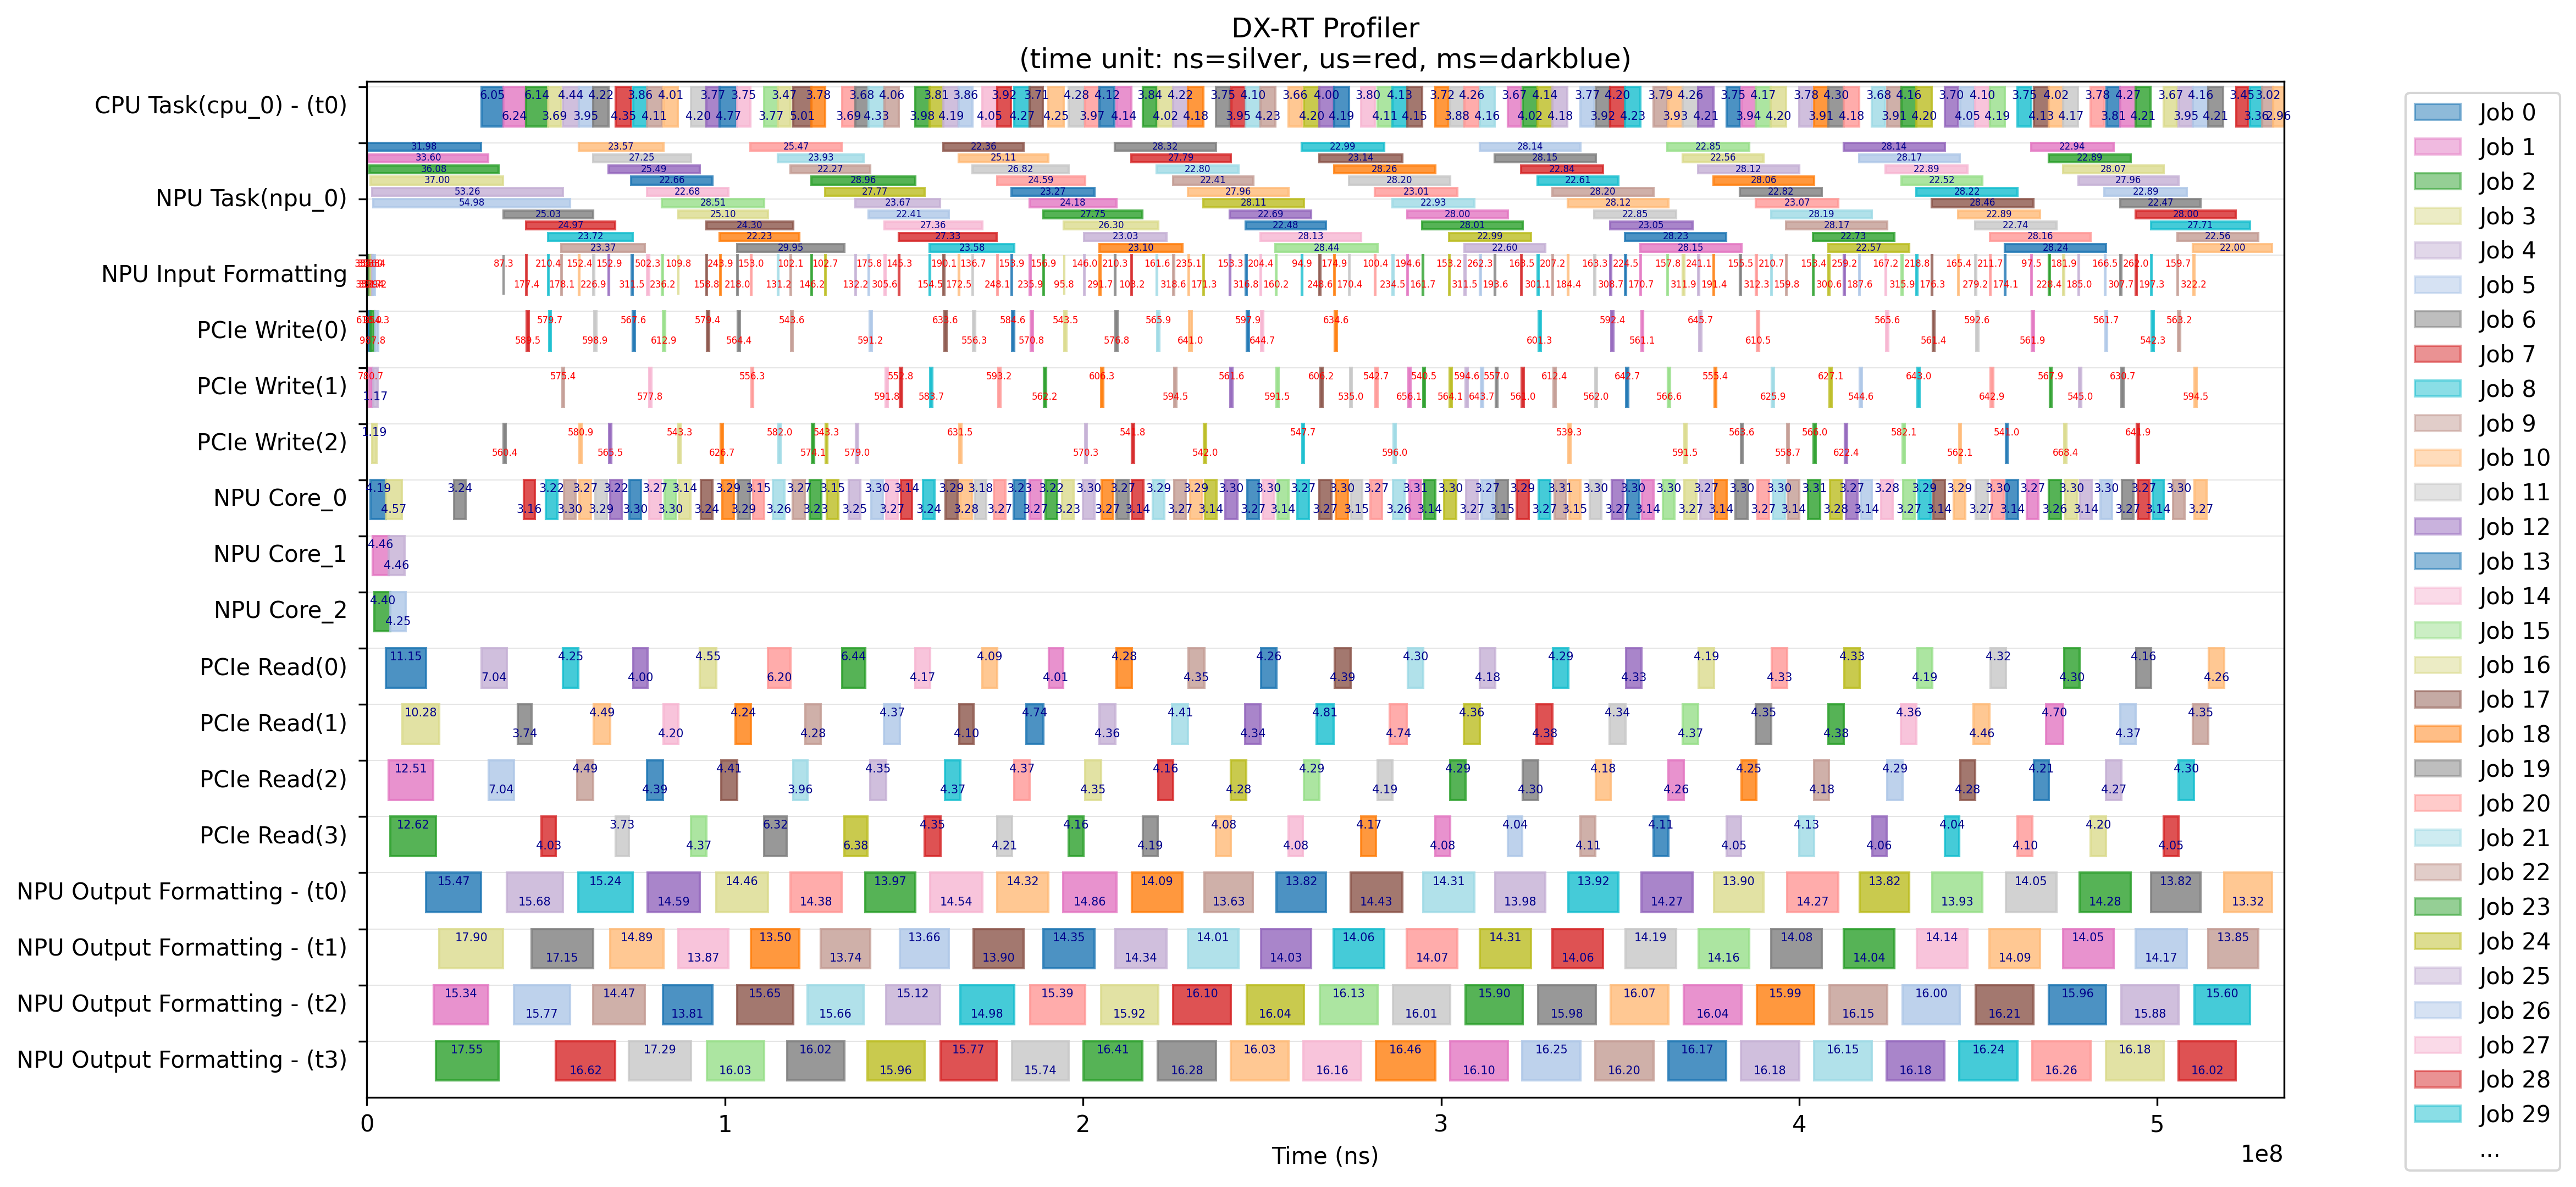
Figure. DX-RT Profiling Report
Script Usage: tool/profiler/plot.py
Use this script to draw a timeline chart from profiling data generated by DX-RT.
usage: plot.py [-h] [-i INPUT] [-o OUTPUT] [-s START] [-e END] [-j JOBS_PER_IMAGE] [-t] [-a]
Optional Arguments
-h, --help: Show help message and exit-i INPUT, --input INPUT: Input.jsonfile to visualize-o OUTPUT, --output OUTPUT: Output base filename; device/job suffixes are added automatically (default:profiler.png)-s START, --start START: Start ratio (0.0–1.0) of the time window-e END, --end END: End ratio (0.0–1.0) of the time window-j JOBS_PER_IMAGE, --jobs-per-image JOBS_PER_IMAGE: Max jobs per image before splitting (default: 200)-t, --show_text: Show duration text labels on bars
The -a, --auto-select option automatically selects 200 jobs from the stable centre region, which can be useful for filtering out warm-up and tail effects.
Profiler Events
The profiler records the following events during inference. Use this table to identify performance bottlenecks and apply the suggested remedies.
| Event | Description | Bottleneck Remedy |
|---|---|---|
| Buffer Wait | Waiting for an available inference buffer | export DXRT_DYNAMIC_CPU_THREAD=ON |
| NPU Input Format Handler | Padding insertion and NHWC conversion for NPU-optimized data alignment | Enable data format conversion acceleration (see Hardware-Accelerated Data Processing) |
| PCIe Write | Transferring input data to NPU over PCIe | — |
| NPU Core | NPU hardware computation | — |
| PCIe Read | Reading output data from NPU over PCIe | — |
| NPU Output Format Handler | Padding removal and NHWC→NCHW conversion of NPU output data | Enable data format conversion acceleration (see Hardware-Accelerated Data Processing) |
| CPU Task Queue Wait | Waiting in the CPU task queue before execution | Enable CPU op acceleration (see Hardware-Accelerated Data Processing) |
| cpu_N | CPU operator execution on thread N (e.g., cpu_0, cpu_1) | Enable CPU op acceleration (see Hardware-Accelerated Data Processing) |
NPU Task represents the total NPU processing time from input formatting through NPU computation to output formatting. It is the aggregate of NPU Input Format Handler, PCIe Write, NPU Core, PCIe Read, and NPU Output Format Handler.
RuntimeEventDispatcher
The RuntimeEventDispatcher is a singleton class that provides a centralized event dispatching mechanism for monitoring and handling runtime events from the DX-RT system. It enables applications to receive notifications about device errors, warnings, and operational events through custom event handlers.
Overview
Runtime events include device status changes, memory operations, core errors, and other operational notifications. The dispatcher supports different severity levels and event categories, allowing applications to filter and respond to events based on their importance.
Event Severity Levels
Events are categorized by severity using RuntimeEventDispatcher::LEVEL:
LEVEL_INFO- Informational messages for normal operation eventsLEVEL_WARNING- Warning messages for potential issues that don't stop executionLEVEL_ERROR- Error messages for recoverable failuresLEVEL_CRITICAL- Critical errors that may cause system instability
Event Types
Events are classified by their source using RuntimeEventDispatcher::TYPE:
DEVICE_CORE- Events related to NPU core operationsDEVICE_STATUS- Device status change eventsDEVICE_IO- Input/Output operation eventsDEVICE_MEMORY- Memory management eventsUNKNOWN- Unknown or unclassified event types
Event Codes
Specific event codes identify the exact nature of events using RuntimeEventDispatcher::CODE:
WRITE_INPUT- Input data write operation eventREAD_OUTPUT- Output data read operation eventMEMORY_OVERFLOW- Memory overflow or capacity exceededMEMORY_ALLOCATION- Memory allocation failure or issueDEVICE_EVENT- General device event notificationRECOVERY_OCCURRED- Device recovery action takenTIMEOUT_OCCURRED- Operation timeout eventTHROTTLING_NOTICE- Device throttling notificationTHROTTLING_EMERGENCY- Device throttling emergency notificationUNKNOWN- Unknown or unclassified event code
Usage Example
Basic Event Handler Registration
#include <dxrt/dxrt_cxx_api.h>
#include <iostream>

int main()
{
    // Get the singleton instance
    auto& dispatcher = dxrt::RuntimeEventDispatcher::GetInstance();

    // Set the minimum event level threshold
    dispatcher.SetCurrentLevel(dxrt::RuntimeEventDispatcher::LEVEL::LEVEL_WARNING);

    // Register a custom event handler
    dispatcher.RegisterEventHandler(
        [](dxrt::RuntimeEventDispatcher::LEVEL level,
           dxrt::RuntimeEventDispatcher::TYPE type,
           dxrt::RuntimeEventDispatcher::CODE code,
           const std::string& message,
           const std::string& timestamp)
        {
            std::cout << "[" << timestamp << "] ";

            // Handle different severity levels
            switch (level) {
                case dxrt::RuntimeEventDispatcher::LEVEL::LEVEL_INFO:
                    std::cout << "INFO: ";
                    break;
                case dxrt::RuntimeEventDispatcher::LEVEL::LEVEL_WARNING:
                    std::cout << "WARNING: ";
                    break;
                case dxrt::RuntimeEventDispatcher::LEVEL::LEVEL_ERROR:
                    std::cout << "ERROR: ";
                    break;
                case dxrt::RuntimeEventDispatcher::LEVEL::LEVEL_CRITICAL:
                    std::cout << "CRITICAL: ";
                    break;
            }

            std::cout << message << std::endl;

            // Take action based on event type or code
            if (code == dxrt::RuntimeEventDispatcher::CODE::RECOVERY_OCCURRED) {
                std::cout << "Device recovery detected - reinitializing..." << std::endl;
                // Implement recovery logic here
            }
        }
    );

    // Your inference code here
    dxrt::InferenceEngine ie("model.dxnn");
    // ... perform inference ...

    return 0;
}
Advanced Event Filtering
// Example: Filter events by type and severity
dispatcher.RegisterEventHandler(
    [](dxrt::RuntimeEventDispatcher::LEVEL level,
       dxrt::RuntimeEventDispatcher::TYPE type,
       dxrt::RuntimeEventDispatcher::CODE code,
       const std::string& message,
       const std::string& timestamp)
    {
        // Only handle critical device core events
        if (level == dxrt::RuntimeEventDispatcher::LEVEL::LEVEL_CRITICAL &&
            type == dxrt::RuntimeEventDispatcher::TYPE::DEVICE_CORE)
        {
            std::cerr << "CRITICAL DEVICE ERROR: " << message << std::endl;
            // Log to file, send alert, etc.
        }

        // Monitor memory events
        if (type == dxrt::RuntimeEventDispatcher::TYPE::DEVICE_MEMORY)
        {
            std::cout << "Memory event: " << message << std::endl;
            // Track memory usage statistics
        }
    }
);
Key Features
- Singleton Pattern - Single instance accessible throughout the application
- Thread-Safe - Uses mutexes and atomic operations for concurrent access
- Custom Handlers - Register callback functions to process events
- Event Filtering - Set minimum severity level threshold
- Automatic Logging - Events are automatically logged with formatted output
Notes
- Only one event handler can be registered at a time; subsequent registrations replace the previous handler
- The event handler is invoked synchronously with minimal lock duration
- Events below the current level threshold may be filtered by custom handlers
- The dispatcher uses a copy-and-execute pattern to minimize mutex contention
How To Create an Application Using DX-RT
This guide provides step-by-step instructions for creating a new CMake project using the DX-RT library.
Step 1. Build the DX-RT Library
Before starting, make sure the DX-RT library is already built.
Refer to Section. Installation on Linux and Section. Installation on Windows for detailed build instructions.
Step 2. Create a New CMake Project
Create a project directory and an initial CMakeLists.txt file.
mkdir MyProject
cd MyProject
touch CMakeLists.txt
Step 3. “Hello World” with DX-RT API
Create a simple source file (main.cpp) that uses a DX-RT API.
#include <dxrt/dxrt_cxx_api.h>
using namespace std;

int main(int argc, char *argv[])
{
 auto& devices = dxrt::CheckDevices();
 cout << "hello, world" << endl;
 return 0;
}
Step 4. Modify CMakeLists.txt
Edit the CMakeLists.txt file as follows.
cmake_minimum_required(VERSION 3.14)
project(app_template)

set(CMAKE_CXX_STANDARD_REQUIRED "ON")
set(CMAKE_CXX_STANDARD "14")

# Set the DX-RT library installation path (adjust as needed)
set(DXRT_LIB_PATH "/usr/local/lib")

# Locate the DX-RT library
find_library(DXRT_LIBRARY REQUIRED NAMES dxrt_${CMAKE_SYSTEM_PROCESSOR} PATHS $
{DXRT_LIB_PATH})

# Add executable and link libraries
add_executable(HelloWorld main.cpp)
target_link_libraries(HelloWorld PRIVATE ${DXRT_LIBRARY} protobuf)
Replace /usr/local/lib with the actual path where the DX-RT library is installed.
Step 5. Build the Project
Compile your project using the following commands.
mkdir build
cd build
cmake ..
make
Step 6. Run the Executable
After a successful build, run the generated executable.
./HelloWorld
You now successfully create and build a CMake project using the DX-RT library.
(Optional) Improving Inference Throughput
The USE_ORT enables the use of ONNX Runtime to handle operations that are not supported by the NPU. When this option is active, CPU-based execution is applied for the unsupported subgraphs of the model via ONNX Runtime.
Beyond this CPU fallback, DX-RT provides two optional features to further improve inference throughput when CPU-side tasks become a bottleneck: hardware-accelerated data processing and dynamic CPU threading.
Hardware-Accelerated Data Processing
DX-RT can leverage platform-specific acceleration libraries to speed up two key CPU-side tasks in the inference pipeline:
- Data Format Conversion Acceleration — Depending on the compiled model, input data may need to be transposed and padded into the NPU-specific layout, and output data may need to be converted back to the host format. When this conversion occurs, it runs on every affected input and output tensor and can become a significant per-frame overhead. DX-RT can accelerate these operations using platform-optimized libraries. Internally, this conversion stage is called the NPU Format Handler (NFH).
- CPU Op Acceleration — Uses optimized execution providers for ONNX Runtime CPU tasks (operations not supported by the NPU), replacing the default CPU provider with a hardware-tuned alternative.
Platform Support
| Acceleration Target | x86_64 | aarch64 |
|---|---|---|
| Data Format Conversion (NFH) | Intel IPP | ARM NEON |
| CPU Op (ORT EP) | OpenVINO EP | XNNPACK EP |
Supported Environments
| Architecture | OS | Status |
|---|---|---|
| x86_64 | Ubuntu 22.04 – 26.04 | Supported |
| aarch64 | Ubuntu 20.04 – 26.04 | Supported |
| x86_64 / aarch64 | Windows | Planned |
When to Use
- Data Format Conversion (NFH): Effective when the profiler shows that NPU Input/Output Format Handler events occupy a significant portion of the inference time.
- CPU Op: Effective only when the CPU-fallback subgraphs contain computation-heavy operations such as Conv or MatMul. The acceleration libraries (OpenVINO, XNNPACK) primarily optimize arithmetic-intensive operations; memory-bound operations like Reshape, Transpose, or Concat will see little to no improvement. Simply having long CPU processing time does not guarantee acceleration — the benefit depends on the type of operations in the CPU subgraphs.
You can use the profiler (see Profile Application section) to identify whether data format conversion or CPU tasks are bottlenecks. If NPU computation dominates the pipeline, enabling acceleration will have minimal effect.
Benchmark Reference
Test Environment
| Item | Detail |
|---|---|
| Host | Orange Pi 5 Plus (aarch64) |
| NPU | DEEPX DX-M1 with PCIe Gen3 x4 |
| OS | Ubuntu 22.04 |
| DX-RT Version | v3.3.0 |
| Model | Q-PRO variants from DEEPX ModelZoo |
| Measurement Tool | dxrun (no pre/post-processing) |
| Iterations | 2000 |
| Build Option | USE_ORT=ON |
Results (FPS)
| Model | Baseline | NFH Only | CPU Op Only | Both |
|---|---|---|---|---|
| YoloV8S | 84 | 86 | 128 | 131 |
| YoloV10S | 68 | 68 | 96 | 98 |
| YoloXS | 250 | 288 | 258 | 288 |
| YoloV11S | 82 | 82 | 127 | 131 |
These numbers are for reference only. Actual performance depends on device conditions, input resolution, and system load. When pre/post-processing is added to the application pipeline, end-to-end FPS may differ from the values shown here.
Step 1. Build with Acceleration Support
Acceleration support is not included in the default build. To enable it, edit cmake/dxrt.cfg.cmake and set the following options to ON:
# cmake/dxrt.cfg.cmake
option(USE_NPU_FORMAT_CONVERSION_ACCELERATION "..." ON)   # default: OFF
option(USE_CPU_OP_ACCELERATION "..." ON)                   # default: OFF
| Build Option | Default | Description |
|---|---|---|
USE_NPU_FORMAT_CONVERSION_ACCELERATION | OFF | Include data format conversion (NFH) acceleration code. Automatically disabled if the platform lacks the required library (e.g., Intel IPP on x86_64). |
USE_CPU_OP_ACCELERATION | OFF | Include CPU op acceleration code. Automatically disabled if the required EP library is unavailable (e.g., OpenVINO on x86_64). |
After changing the options, perform a clean build:
./build.sh --clean
A clean build is required after changing these options. Incremental builds may not pick up the change correctly.
The build system automatically downloads and installs the required acceleration libraries (Intel IPP, OpenVINO, XNNPACK, etc.) during the clean build. An internet connection is required at build time. You do not need to install these libraries manually.
If a library cannot be obtained (e.g., due to network restrictions or platform incompatibility), the corresponding acceleration option is disabled even when set to ON.
Step 2. Enable at Runtime
Even after building with acceleration support, the feature is disabled at runtime by default. To activate it, use the Configuration API in your application:
C++ Example
#include <dxrt/dxrt_cxx_api.h>

auto& config = dxrt::Configuration::GetInstance();
config.SetEnable(dxrt::Configuration::ITEM::NFH_ACCELERATION, true);
config.SetEnable(dxrt::Configuration::ITEM::CPU_OP_ACCELERATION, true);
Python Example
from dx_engine import Configuration

config = Configuration()
config.set_enable(Configuration.ITEM.NFH_ACCELERATION, True)
config.set_enable(Configuration.ITEM.CPU_OP_ACCELERATION, True)
To quickly test the effect of acceleration without modifying application code, you can use the dxrun CLI tool with the --accel-nfh and --accel-cpu options:
dxrun -m model.dxnn --accel-nfh --accel-cpu
The acceleration APIs (ITEM::NFH_ACCELERATION, ITEM::CPU_OP_ACCELERATION) and CLI options (--accel-nfh, --accel-cpu) are only available when the corresponding CMake option is set to ON at build time.
If the feature was not compiled in (default OFF build), these enum values and CLI options do not exist: using them will result in a compilation error (C++) or an "unrecognized arguments" error (CLI).
Enabling acceleration does not guarantee a performance improvement for every model. The effect depends on the model structure, operation types, and host platform. In particular, CPU op acceleration primarily benefits arithmetic-heavy operations (Conv, MatMul); memory-bound operations (Reshape, Concat) may see little improvement.
Improving CPU Capacity with Dynamic Threading
When executing CPU task via ONNX Runtime, performance bottlenecks may arise depending on the Host CPU performance and symbol load. To address this, DX-RT provides an optional dynamic multi-threading feature that can improve throughput in high-load scenarios.
Feature Overview
- Dynamically increases the number of threads allocated to ONNX Runtime tasks
- Monitors the input queue load to determine CPU congestion
- Designed to boost FPS when CPU-bound tasks become a bottleneck
Enabling Dynamic CPU Threading
To enable this feature, set the following environment variable:
export DXRT_DYNAMIC_CPU_THREAD=ON
This activates internal logic to automatically adjust the ONNX Runtime thread pool size based on queue pressure.
When high CPU task load is detected at runtime, the system may print the following message:
To improve FPS, set: 'export DXRT_DYNAMIC_CPU_THREAD=ON'
This serves as a recommendation to enable the feature for improved inference performance.
Enabling the DXRT_DYNAMIC_CPU_THREAD=ON option does not guarantee an FPS improvement in all cases. The effectiveness of this feature depends on the specific workload, input size, and CPU capacity of the system.